Monday, August 12, 2013

Sweet Watermelon Sign (summer craft)

Nothing says summertime like fresh, juicy watermelon. A regular menu item at picnics and barbecues and a popular summer decorating theme makes this sweet watermelon sign from Amanda Formaro a great popsicle stick craft.
 
Sweet Watermelon Sign
 
Materials:
  • 9 jumbo craft sticks
  • Scrabble tile letters*
  • 12" piece of raffia
  • Pink button
  • 24" craft wire
  • White craft glue
  • Brown or black Sharpie marker
  • Hot glue gun
  • Scraps of felt
  •  Paints: pink, green, dark green, black and white
*Note: You can use actual recycled scrabble tiles from an old board game, or purchase these alphabet tiles at your local craft supply store.

Instructions:
  1. Paint three of the craft sticks green and the remaining six pink. When dry, use the handle end of a paintbrush to add seeds to the pink craft sticks with black paint. Use a liner brush to add dark green small triangular shapes along one side of each of the green craft sticks.
     
  2. Dry brush** the alphabet tiles with white paint and go over the letters with a Sharpie.
     
  3. With a piece of scrap paper underneath, glue the pink craft sticks together, side by side.
     
  4. Glue one of the green craft sticks to the left of the pink ones with the dark green triangles facing to the left. Glue a second green craft stick to the right side of the pink sticks, this time with the green triangles facing to the right. Finally, glue the last green craft stick to the bottom all the others with the green triangles facing downward. Let dry.
     
  5. Peel as much paper off the back of the plaque as you can, though you may want to leave some in place as it an help to hold the item together. Dry brush white paint onto each craft stick.
     
  6. Hot glue the alphabet tiles to the front of the plaque.
     
  7. Thread the raffia through the button holes and tie into bow. Trim the excess and hot glue to the upper left corner of the plaque.
     
  8. Wrap the craft wire around a pencil or the handle of a paint brush. Slide the coiled wire off and stretch it out. Curve into a hanger, trim if needed. Turn the plaque over and hot glue the ends of the hanger to the back of the plaque. Cut small scraps of felt to cover the ends of the wire and hot glue in place. This will protect the wall from being scratched by the wire ends.
     
  9. Hang!
**Dry brushing means to add paint to your paint brush, then wipe the excess off of the brush onto paper towel. Use the 'dried' brush to lightly stroke the paint onto the surface giving it a soft, wispy appearance.

Seashell Charm (summer craft)

Bring the beach to you with this Seashell Charm. This textured seashell is perfect for embellishing handmade greeting cards or other paper crafts. It's a fun summer craft that will remind you of days spent at the beach.

Seashell Charm

Materials:
  • Chipboard
  • Texture paste
  • Sand
  • Paper piercer
  • Brown ink
Instructions:
  1. Take a blank piece of chipboard (already in a shell shape or cut one out)

    Seashell Charm
     
  2. Cover the chipboard with texture paste. You can use your finger, it has the consistency of frosting.

    Seashell Charm
     
  3. Sprinkle the texture paste with sand. Use a paper piercer to draw lines. Sprinkle again to fill in the lines a bit.

    Seashell Charm
     
  4. I distressed the edges a bit with brown ink.

    Seashell Charm
 

.
.

Neon Jersey Rug (crochet craft)

Brighten up any room in your home with this colorful and fun Neon Jersey Rug.  Made with strips of jersey fabric, this DIY crochet rug pattern is soft on your feet and comfortable to sit and lay on.  This pattern is great for beginner and advanced crocheters alike.  You can make your rug striped like this one or use a single color to make a solid rug that will liven up your living room or bedroom.
Neon Jersey Rug
Materials:
  • Dressmaker Shears (9")
  • 7 yards of tan jersey knit
  • 5 yards bright yellow jersey knit 
  • Crochet hook N (9.00mm)

Instructions:
  1. I bought several yards of jersey knit from the fabric store. Jersey knit can be bought at a very reasonable price if you shop around. I think the tan knit I bought was $3 a yard and the bright yellow was $2 a yard, making my project cost about $30 total. However, as with many crafts what you save in money you spend in time!
     
  2. To cut the fabric into yarn, it is necessary to have a pair of long, sharp scissors. You are going to be doing A LOT of cutting and it makes sense to have the scissors do the work – not you! I used my favorite 9” Dressmaker shears, with its long blades that cut easily through 2 layers of fabric with very little strain to my hands.

     Neon Jersey Rug
     
  3. I began by folding my fabric in half over my cutting table and starting at the raw edges, cut across the fabric towards the folded edge about 1” in from the bottom.

    Neon Jersey Rug
     
  4. Stopping ½ ” short of the folded edge, I turned my shears back towards the direction they had come from and cut 1” above the previous cutting line.
     
  5. As I reached the raw edges opposite the folded edge, I again stopped ½ ” short of cutting through to the end, removed the shears and brought them back around to the outside of the raw edges and cut again.

    Neon Jersey Rug
     
  6. I worked back and forth in this manner for about 1 yard’s length of fabric, at which point I cut the line completely at the folded edge, to remove the fabric from the remaining yardage.

    Neon Jersey Rug
     
  7. Next I had to cut into the fabric to create one long strip which I did by finding the folded edges I had left, and snipping them apart through the fold.

    Neon Jersey Rug
     
  8. To make the jersey more ‘yarn-like’, I pulled it tightly through the handles of my scissors (for friction) to make the edges curl. This turns the fabric from strips into something resembling twine or string.

    Neon Jersey Rug
     
  9. I then rolled the yarn into a ball and repeated the process for the remaining yardage.

    Neon Jersey Rug
     
  10. Ch 5. Sl st into 5th Ch from hook to form ring.
     
  11. Ch 2. 11 dc in ring. Join to ch 2 with sl st. (12 st)
     
  12. Ch 2. Dc in same stitch. 2 dc in each stitch around. Join to ch 2 with sl st. (24 st)
     
  13. Ch 2. Dc in same st, dc in next st. *2 dc in next st, dc in next st* all the way around. (36 st)
     
  14. Ch 2. Dc in same st, dc in next 2 st. *2 dc in next st, dc in next 2 st*all the way around (48 st)
     
  15. Ch 2. Dc in same st, dc in next 3 st. *2 dc in next st, dc in next 3 st* all the way around (60 st)

    Neon Jersey Rug
     
  16. Continue to increase according to pattern until you get to the desired size. I changed colors whenever I felt the need. Because the stitches are large and the yarn forgiving, I simply cast on the new color yarn by tying it on to the previous strand, hiding the knots on the underside of the rug.

.

Simple Sea Shell Cake Stand (summer craft)

Make this Simple Sea Shell Cake Stand for some seasonal decor at your next summer party! It's so simple to do that you can throw this.home decor project together minutes before your party starts! This great quick project is from is from the magazine Holiday with Matthew Mead Summer edition.
Simple Sea Shell Cake Stand
Materials:
  • Glass cake stand
  • Ribbon
  • Assorted sea shells
  • Hot glue gun
Instructions
  1. Use a hot glue gun to adhere thin ribbon around the cake stand's edge.
     
  2. Hot glue the clean shells to the ribbon in the order of your choosing.
.

Colorful Summer Beach Mat (crochet craft)

This Colorful Summer Beach Mat from Bernat Yarns is great to bring to the beach...or just to add some bright colors to your home!  Perfect for those who are new to crochet, this crochet mat is easy to make and fun to display!  Great for summer, spring, or anytime!
Colorful Summer Beach Mat
Materials:
  • Bernat® Handicrafter Cotton (50 g/1.75 oz)
    • Main color (MC)  (Blue) 5 balls
    • Contrast A (Green) 4 balls
    • Contrast B (Orange) 4 balls
    • Contrast C (Pink) 4 balls
Size 4.5 mm (U.S. 7) crochet hook or size needed to obtain gauge.
MEASUREMENTS:  Approx 28 x 60 ins [71 x 152 cm].
GAUGE:  14 sc and 16 rows = 4 ins [10 cm].
 
Instructions:
  1. Note: When changing colors, work to last 2 loops on hook of last st, then draw new color through rem 2 loops and proceed.
     
  2. With MC, ch 99.
     
  3. 1st row: (RS). 1 dc in 4th ch from hook (counts as 2 dc). 1 dc in each ch across. 97 sts. Join A. Turn.
     
  4. 2nd row:With A, ch 1. 1 sc in each dc across. Join MC. Turn.
     
  5. 3rd row:With MC, ch 3 (counts as dc). 1 dc in each sc across. Join A. Turn.
     
  6. 4th row: As 2nd row. Join B. Turn.
     
  7. 5th row: With B, as 3rd row. Join C. Turn.
     
  8. 6th row: With C, as 2nd row. Join B. Turn.
     
  9. 7th row: As 5th row.
     
  10. 8th row: With C, as 2nd row. Join A. Turn.
     
  11. 9th row: With A, as 3rd row. Join MC. Turn.
     
  12. 10th row: With MC, as 2nd row. Join A. Turn.
     
  13. 11th row: As 9th row.
     
  14. 12th row: With MC, as 2nd row. Join C. Turn.
     
  15. 13th row: With C, as 3rd row. Join B. Turn.
     
  16. 14th row: With B, as 2nd row. Join C. Turn.
     
  17. 15th row: As 13th row.
     
  18. 16th row: With B, as 2nd row. Join MC. Turn.
     
  19. 17th row: With MC, as 3rd row. Join A. Turn.
     
  20. Rep 2nd to 17th rows for Stripe Pat until work from beg measures approx 57½ ins [146 cm] ending on a 4th row of pat. Fasten off.
     
  21. Edging: 1st rnd: With RS facing, join MC with sl st to any corner of Mat and work 1 row of sc evenly around outer edge, working 3 sc in corners. Join with sl st to first sc.
     
  22. 2nd rnd: Ch 1. Working from left to right, instead of from right to left as usual, work 1 reverse sc in each sc around. Join with sl st to first sc.
     
  23. Fasten off.
     
  24. Ties: (make 2) With MC, make a chain 36 ins [91.5 cm] long. Turn ch sideways and sl st in each ‘bump’ at side of chain. Fasten off. Fold each tie in half and sew to short end of Mat 2½ ins [6 cm] in from side edges.
.

Blue Beaded Poncho (crochet craft)

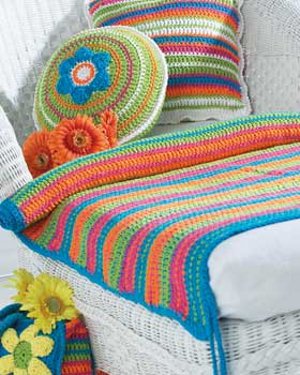
This beautiful crochet pattern transforms yarn and beads into a delicate, bright blue poncho.  Stand out among the yellow leaves with this bold and colorful crochet pattern.


Materials:
  • Moda Dea Beadnik, 50 gm – 1.76 oz., 103 yd, #4 medium, Blue Beat
  • Crochet Hook US I, 6.5mm and us K, 7mm
Stitches: Ch – Chain, Slst – Slip Stitch, Sc – Single Crochet, Dc – Double Crochet

Note: Do not count Ch1 at beginning of each row/round as a stitch on first 10 rows.

Size: As a poncho, Adult/teen.  Teens and small sizes can use the poncho as an overskirt.
Instructions:
With I hook, Ch 81
Row 1: Sc in second Ch from hook and in each Ch across, turn (80 sc)
Row 2: Ch 3, Dc in next sc, *Ch 1, skip next sc, Dc in next 2 sc, Repeat from * to end of row, turn (55 dc + 25 sp)
Row 3: Ch 1, Sc in each dc and each space across, turn (80 sc)
Row 4: Ch 1, Sc in same space and next 2 sc, *Sc in next 17 sc, 2 Sc in next sc, Repeat from *3 times, Sc in last 5 sc, turn, (84 sc)
Row 5: Ch 1, Sc in same space, *Sc in next 19 Sc, Sc 2 times in next Sc, Repeat from *3 times, Sc in last 3 sc, turn, (88 sc)
Row 6: Ch 1, Sc in same space, Sc in each sc across, turn (88 sc)
Row 7: Ch 1, Sc in same space, Sc in next sc *Sc in next 20 Sc, Sc 2 times in next Sc, Repeat from *3 times, Sc in last 2 sc, turn, (92 sc)
Row 8: Ch 1, Sc in same space, Sc in next 5 sc *Sc in next 20 Sc, Sc 2 times in next Sc, Repeat from *3 times, Sc in last sc, turn, (96 sc)
Row 9: Ch 1, Sc in same space, Sc in next 2 sc, *Sc in next 17 Sc, Sc 2 times in next Sc, Repeat from *4 times, Sc in last 3 sc, turn, (101 sc)
Row 10: Ch 1, Sc in same space, Sc in each sc across, turn, (101 sc)
Note:.work in rounds for the rest of pattern joining the end of each round to the top of the first stitch in each round with a slst. All Ch 3 count as first Dc.
Rnd 11:.Changing  to K hook, Ch 1, Sc in same stitch, sc in next 100 sc, join with a slst in beginning sc (101 sc)
Rnd 12: Ch 3, Dc in next 4 sc, Dc 2 times in next sc, * Dc in next 8 sc, Dc 2 times in next sc, Repeat from * 9 times, Dc in last 5 sc, join with slst in beginning (111 sc)
Rnd 13: Ch 3, *2 Dc in next dc, Ch 1, Skio next dc, Dc in next dc, Repeat from * around, Dc in last dc, join with a slst in beginning ch 3 (106 dc + 35 ch1 sp)
Rnd 14: Ch 1, Sc in each dc and each ch 1 space around, join with a slst in top of sc (141 sc)
Rnd 15: Ch 3, Dc in same st as ch 3, *Ch1, Skip next sc, Dc Ch1 Dc in next sc, Repeat from * to end of round, join with slst to top of ch 3 (140 dc + 70 ch1)
Rnd 16: Ch 1, Sc in each dc and each ch 1 space around, join with a slst in top of sc (210 sc)
Rnd 17: Ch 3, Dc in same st as ch 3, *Ch1, Skip next sc, Dc Ch1 Dc in next sc, Repeat from * to end of round, join with slst to top of ch 3 (210 dc + 106 ch1)
Rnd 18: Ch 1, Sc in each dc and each ch 1 space around, join with a slst in top of sc (316 sc)
Rnd 19: Ch 3, *Ch1, Skip next sc, 1 Dc in next sc, Repeat from * to end of round, join with slst to top of ch 3 (158 dc + 158 ch1)
Rnd 20: Ch 1, Sc in each dc and each ch 1 space around, join with a slst in top of sc (316 sc)
Rnd 21: Ch 3, (**Ch 1, Skip next sc, 1 Dc in next sc, Repeat from ** 37 times, then Ch 1, Skip next sc, Dc Ch1 Dc in next sc,) Repeat between (**) 3 more times, Ch 1, Skip next sc, Dc in next sc, Ch 1, Skip next sc, join with slst to top of ch 3 (162 dc + 162 ch1)
Rnd 22: Ch 1, Sc in each dc and each ch 1 space around, join with a slst in top of sc (324 sc)
Rnd 23: Ch 4 (counts as Dc & Sp), Dc in next sc, Ch 1, Skip next sc, Dc in next sc, (**Ch 1, Skip next sc, 1 Dc in next sc, Repeat from ** 28 times, then Ch 1, Skip next sc, Dc Ch1 Dc in next sc,) Repeat between (**) 5 more times, Ch 1, Skip next sc, *Dc in next sc, Ch 1, Skip next sc, Repeat 9 times join with slst to top of ch 3 (168 dc + 168 ch1)
Rnd 24: Ch 1, Sc in each dc and each ch 1 space around, join with a slst in top of sc (336 sc)
Rnd 25: Ch 4, Skip next sc, *1 Dc in next sc, Ch 1, Skip next sc, Repeat from * to end of round, join with slst to top of ch 3 (168 dc + 168 ch1)
Rnd 26 through 29: Repeat Rnd 24 and Rnd 25, 2 times each. (336 stitches/168 dc + 168 ch1)
Rnd 30: Repeat Rnd 24.
Rnd 31: Ch 3, (**Ch 1, Skip next sc, 1 Dc in next sc, Repeat from ** 31 times, then Ch 1, Skip next sc, Dc Ch1 Dc in next sc,) Repeat between (**) 4 more times, Ch 1, Skip next sc, *Dc in next sc, Ch 1, Skip next sc, Repeat from* 1 time, join with slst to top of ch 3 (173 dc + 173 ch1)
Rnd 32: Ch 1, Sc in each dc and each ch 1 space around, join with a slst in top of sc (346 sc)
Rnd 33: Ch 4, Skip next sc, *1 Dc in next sc, Ch 1, Skip next sc, Repeat from * to end of round, join with slst to top of ch 3 (173 dc + 173 ch1)
Rnd 34 through 45: Repeat Rnd 32 and 33 6 times each. (346 stitches/173 dc +173 ch1)
Rnd 46 – 47: Repeat Rnd 32, Fasten off and weave in ends.

Beaded Chain Tie:
Leave a 12 inch tail at beginning of chain and end of chain for beading. With I Hook and leaving tail Ch 190, tie off leaving tail at end.  Thread one tail through small eyed needle.  Using needle string 8 turquoise and 8 brown beads on tail in a pattern of your choice.  Tie off with knot and leave a small tassel of yarn at end.  Weave chain tie in and out of open spaces at collar edge of poncho loosely and tie in bow.  Optional Button: Sew a small matching button to top stitch at neck even with a stitch space on opposite side if desired.
.

Wednesday, August 7, 2013

Patriotic Bath Scrubs (summer crafts)

If you've ever wanted to know how to make bath scrubs, this is the project for you.  Combine glycerin soap, white sugar and delicious fragrances to create your own Patriotic Bath Scrubs.

Materials:
  • 4 oz. by weight clear glycerin soap (for the red and blue scrubs)
  • 2 oz. by weight white glycerin soap (for the white scrubs)
  • 18 oz. by weight white sugar
  • 6 oz. by weight grape seed oil (jojoba, sweet almond or olive oil may be substituted)
  • Pinkberry sherbet lab color
  • Milk Way basic square mold
  • Brilliant blue lab color
  • Red Apple Fragrance for your red scrubs
  • Sun-Ripened Raspberry Fragrance for your blue scrubs
  • White Tea & Ginger Fragrance for your white scrubs
  • Blunt edge soap cutter or knife
  • 2-cup glass measuring cup or melting soap
  • Spoons
  • Cutting surface
  • Wide mouth jars or plastic food containers for storage
NOTE: These ingredients will be split into three batches: one red, one white and one blue.
Instructions:
  1. Melt 2 oz. of clear soap in the microwave using your 2-cup glass measuring cup. This should take about 30 seconds.


  2. Mix 2 oz. of your oil with the melted soap and stir until blended. The mix should still be liquid at this point. If it starts to thicken pop back in the microwave for a few seconds until your soap/oil mix is liquid.
     
  3. Add color, pinkberry sherbet lab color to your liking and mix thoroughly. For this project I diluted the 10ml bottle of lab color in 2 oz. of water and used 4 drops. (skip this step for the white scrubs).
     
  4. Add 20 drops of fragrance oil and mix thoroughly.

         
  5. Add 6 oz. of the sugar and stir rigorously until completely blended.


  6. Pour or spoon into you mold cavities. You should have a thick yet pourable mixture at this point. If it is too thick to spoon or pour into your mold you may heat for a few seconds in the microwave, but don’t heat it for too long as the sugar will begin to dissolve.
     
  7. Each color will make enough to fill 2 of the 4 cavities of the mold. Let harden to room temp and pop out of the mold! Note you may have to pat down the mixture with your fingers as it may thicken quickly.
     
  8. Repeat steps one through six for your blue and white scrubs, making sure to use the white glycerin soap for the white scrubs.
     
  9. After you have all of the scrubs unmolded, cut them into quarters using a knife or soap cutter.


  10. Store in an airtight container such as a wide mouth jar until you are ready to use them. The glycerin soap in the recipe makes for a creamy emulsified scrub when mixed with water. To use, just take one scrub into the shower, knead with a little water in the palm of your hand and scrub over your skin! These will stay fresh for 3 months and be sure to keep them away from moisture so they don’t melt. Enjoy!
.

Tiny Teacup Topiary (spring craft)

Add a touch of elegance to any setting.  This charming topiary is easy to make and sure to delight, whether it's for an afternoon tea, a bridal shower, or simply to brighten up your home.
Tiny Teacup Topiary
Materials:
  • STYROFOAM™ Brand Products:
    • Balls, 1-1/2" and 2"
  • Silk flowers, assorted small flowers to match cup
  • Silk flower stem, 6" length (model used rose stem)
  • Demitasse cup, with or without saucer
  • Wire cutters
  • Scissors
  • Low temperature glue gun and glue sticks
  • Ribbon, 1/2 yd x 5/8", wire edge
  • Green moss
Instructions:
  1. Insert and glue 1" of silk flower stem in 1-1/2" ball.
     
  2. Cut flowers from stems and glue to 1-1/2" ball; continue until ball is covered.
     
  3. Place 2" ball in cup; if needed, flatten sides to fit. Flatten top of ball so it's level with rim of cup. Glue in place.
     
  4. Insert and glue 1-1/2" of flower stem in foam ball in cup.
     
  5. Cover foam base with green moss.
     
  6. Make two-loop bow with center knot. Secure with floral wire. Wire bow to the topiary stem, under center front of ball; glue in place.
.

Teapot Flowers Topiary (spring craft)

A burst of  bright silk flowers affixed atop a delicately-painted teapot, this topiary makes a beautiful centerpiece. Display with  our Teacup Roses Topiary!

Materials:
  • STYROFOAM* Brand Products:
  • Ball, 3-1/2"
  • Sheet, 1" thick scraps
  • Teapot
  • Twig, 10" x 1/2"
  • Silk flowers: assorted roses, peonies, gyp, weigela and others to match teapot
  • Pearl loops, 3mm, 12
  • Pearls, 14mm
  • Ribbon, #9, 3-1/4 yds, sheer pink
  • floral wire, 6", cloth-covered
  • Floral pics, 9", three
  • Spray paint, gold
  • Green moss
  • Pencil
  • Scissors
  • Wire cutters
  • Low temperature glue gun and glue sticks
  •  
Steps:
1. Paint twig gold; stand in 1" foam scrap to dry.

2. Using wire cutters, trim flowers stems to 1".

3. With pencil, make a 3" deep hole in foam ball; glue twig in hole.

4. Glue and insert flower stems in ball; continue, until ball is covered.

5. Cut up 1" foam sheet and fill teapot with foam pieces; glue foam in place.

6. Using pencil, make hole in center of foam. Glue twig in hole.

7. Cover foam base with green moss.

8. Cut nine 8" lengths of ribbon; twist wired floral pick around center of each. Arrange pics around ball; glue in place.

9. Make four-loop bow with remaining ribbon. Secure with floral wire. Glue bow to bottom front of topiary.

10. Glue pearl loops and 14mm pearls among flowers.
 

.

Clay Pot Pool Party (summer craft)


Clay Pot Pool Party

Create a too-cool pool scene that will last all year round with terra cotta and Patio Paint.

No Image

.

    DecoArt Products Required
Patio Paint
  • DCP14 - Cloud White
  • DCP15 - Daisy Cream
  • DCP16 - Patio Brick
  • DCP21 - Wrought Iron Black
  • DCP25 - Citrus Green
  • DCP28 - Fiesta Yellow
  • DCP33 - Hydrangea Blue
  • DCP36 - Tiger Lily Orange
  • DCP41 - Carnation Pink
  • DCP43 - Holly Berry Red
  •     Supplies
        Surfaces
  • Lifeguard
  • 1 1/2" standard pot
  • 1 1/4" wood ball bead
  • Small piece of blue foam
  • Natural or tan chenille stem
  • Toothpick
  • Small triangle of red foam
  • Kid on a Raft
  • 1 1/4" wood ball bead
  • Natural or tan chenille stem
  • Beach Ball Girl
  • 1 1/4" ball bead
  • 1 1/2" Styrofoam ball
  • Natural or tan chenille stem
  • Yellow yarn
  • 3/4" flat brush
  • #8 flat brush
  • #0 liner brush
  • Water container
  • Palette or plastic plate
  • Paper towels
  • Thick craft glue or low-temp glue gun and glue sticks
  • Scissors
  • Wire cutters
  • Ultra-fine tip black permanent pen, optional
  • Lifeguard
  • 2 1/2" rose pot stand
  • 2 1/2" saucer
  • Kid on a Raft
  • 3" saucer
  • 1 1/2" standard pot
  • Beach Ball Girl
  • 1 1/2" standard pot
  • Pool
  • 8" clay saucer


  •     Instructions
    Let paint dry between steps.

    Preparation:
    Flesh color mix suggestion: Daisy Cream and Patio Brick 16:1.
    Turquoise mix: Cloud White, Hydrangea Blue, and Citrus Green 4:1:1

    Lifeguard
    1. Paint ball bead and top half of pot body, flesh color mix; bottom half of pot, turquoise mix; rose pot rim and saucer, Holly Berry Red; and remainder of rose pot, Fiesta Yellow.
    2. Use brush handle end to dot Hydrangea Blue flower petals on bathing trunks and Holly Berry Red around rose pot rim. Dot flower centers with Tiger Lily Orange.
    3. Assembly: Trim chenille stem to form arms. Bend arm ends to form hands. Position and adhere arms on body. Position and adhere head on arms. Adhere toothpick to foam flag. Position and adhere onto hand. Position saucer on rose pot to form lifeguard stand.
    4. Paint top of head Hydrangea Blue to form cap.
    5. Use liner brush and Wrought Iron Black or black permanent pen to do face.

    Kid on a Raft
    1. Paint ball bead and top half of pot body, flesh color mix; bottom half of pot, Citrus Green; and saucer, Tiger Lily Orange.
    2. Use brush handle end and Fiesta Yellow to dot bathing trunks.
    3. Paint sunglasses on head with Wrought Iron Black.
    4. Use liner brush and Wrought Iron Black or permanent black pen to do face.
    5. Assembly: Trim chenille stem to form arms. Bend arm ends to form hands. Position and adhere arms on body and head on arms. Bend arms above head. Bend chenille stem in half. Position and adhere up inside clay pot for legs. Bend legs at knees and feet. Place kid in raft and secure with glue.

    Beach Ball Girl
    1. Paint ball bead flesh color and pot, Carnation Pink.
    2. Paint small Hydrangea Blue flowers on pot.
    3. Paint face with liner brush and Wrought Iron Black or permanent pen.
    4. Position and adhere chenille stem arms on body. Position and adhere head.
    5. Cut lengths of yarn for hair. Place a bead of glue down center or head and press yarn pieces into glue. Tie into two pigtails with ribbon.
    6. Use pen, stylus or other tool to score 6 equal sections on Styrofoam ball. Alternately paint with Holly Berry Red, Fiesta Yellow, and Hydrangea Blue.
    7. Position chenille stem arms above head. Bend ends and push into Styrofoam ball. Secure with glue, if necessary.

    Swimming Pool
    1. Paint outside of saucer, Hydrangea Blue.
    2. Paint inside bottom, turquoise mix.
    3. Paint inside rim Hydrangea Blue forming peaks to resemble water.

    Small Potholder (sewing craft)


    Small Potholder
    These small potholders are perfect for lifting hot lids or dishes. Attach the two with ribbon and hang them near the microwave for easy access!
    Finished size approximately 8"
    MATERIALS
    • 1/8 yd cotton fabric (muslin, lightweight denim, etc.)
    • 10" x 8" piece of wool felt or cotton batting (sew-in or fusible)
    • Six-strand cotton embroidery floss

    DIRECTIONS
    1. Transfer the design of your choice onto the pockets and embroider before assembling the potholder. Fold pockets in half along fold line, wrong sides facing. Iron and baste in place on the right side of the upper fabric piece.

    2. Place felt or batting on the wrong side of fabric, and baste or iron in place.

    3. Lay the fabric with the padding on top of the piece with the pockets, right sides facing. Sew together, leaving an opening between dots for turning.

    4. Trim seams and clip curves. Turn right side out and sew closed with blindstitch.

    Handkerchief Sachets (gift craft)


    I have a few hankies saved from my grandmother and decided to turn them into something useful. I think these would make the sweetest Mother’s Day Gifts.
    No worries if you don’t have handkerchiefs. Antique stores usually have a great selection for about .50 cents to $2.00 each.

    Take one handkerchief and lay it out flat.

    Fold the handkerchief in half and then half again. Line up all edges and press.
    The handkerchief could have been cut, but I just couldn’t bear to cut into the hankies. I also liked the sachets thicker and didn’t want to have to finish raw edges.

    Machine stitch around the handkerchief about a half inch from the edge (on larger hankies I sewed 1 inch from the edge). Leave a one inch opening on a side that can be filled. I left the opening on the first fold adjacent to the last fold (see picture).

    Fill handkerchief with dried lavender (I found mine at Save On Crafts). A funnel makes this go quickly.  If you don’t have a small plastic funnel a piece of paper rolled into a cone works also. Don’t overfill as it will make it harder to sew sachet closed.
    Close opening by finishing stitching line. The stitching line could also be embellished with hand embroidery.

    Beach Sarong and Matching Flip Flops (summer craft)

    Use your favorite fabric to create a cute matching set for the beach. This beginner sewing project can be done in one hour or less.

    Beach Sarong
     
    Fabric Sandals


    Materials For Sarong:
    • Required fabric = your hip measurement + 36”.
    • example your hip measurement = 32” + 36”= 68” or 1 7/8 yards Iron and ironing surface
    • Sewing machine or heat activated adhesive tape
    Instructions For Sarong:
    1. Wash the fabric to allow for any shrinkage that might occur.
       
    2. Trim off the selvage edges of the fabric. Press the rough edges on all four sides of the fabric under 1/4”. Press folded edge under 1/2”to create a hem.
       
    3. Secure the folded edges with a regular sewing machine. If you don’t sew, create a “hem” on folded edges with heat activated adhesive tape. Follow the package instructions for the heat activated adhesive tape.

    Materials For Flip Flops:
    • 1/4 yard fabric
    • 1 pair flip flops
    • Scissors
    Instructions For Flip Flops:
    1. Cut 1” x 9” strips of fabric.
       
    2. Tie the strips in a knot around the straps of the flip flops.
       
    3. Continue to add strips alternating sides until you have the flip flop fringe as full as you choose. Trim fringe with scissors to desired length.
    .

    Breakfast Gift Basket

    Breakfast Gift Basket


    Filled gift basket.

    Contents

    • tea for one teapot
    • Earl Grey tea bags (24)
    • passion fruit tea bags (24)
    • peppermint tea bags (24)
    • tea bag wallet with 4 tea bags
    • cappuccino mix in a bag
    • clover honey
    • Morello cherry fruit spread
    • honey in 5# jars from a local beekeeper*

    Directions:

    1. *I poured some honey in a clean jar which was sterilized in my dishwasher. I put some Saran Wrap over the top, screwed the lid on tightly. Finally I taped the neck of the jar closed and sewed a jar topper out of scrap fabric.
    2. Some time ago I purchased a package of new chef's aprons which I always keep on hand for whenever I'm baking or cooking. So I added one in the gift basket.
    3. I purchased a new tea for one teapot from a website and attached the following label:
      Warm your teapot:
      While the water is heating, fill your teapot with hot tap water to preheat it. This prevents cracking that can occur when boiling water is placed in a room temperature teapot, and it helps the brewed tea maintain the proper temperature. Discard the water once the pot is warm.

    Poseable Guardian Angel (craft)


    Materials Needed:
    • freezer paper for making templates
    • 6" x 15" flesh colored fabric for head, feet, hands
    • 22" x 18" (fat quarter) print for body, sleeves, skirt 
    • (or you can create a contrasting skirt with another fabric)
    • 4" square gold ultra leather or thin vinyl for sandal bottom
    • 14" of 1" wide Cluny Lace for collar and sleeves
    • 12" of 1-1/2" wide wired ribbon for halo
    • 4" of 1" wide gold trimmed lace for slippers
    • 14" of gold trim for belt and sleeves
    • matching threads
    • 2 pipe cleaners – 12" each
    • 14 tablespoons of plastic weighting pellets
    • button and carpet thread for joining arms
    • 2 - 6mm and 2 size E seed beads for joining arms
    • 3.5" needle for jointing
    • fiberfill
    • yarn or mini curl doll hair for hair
    • fine line permanent markers (Micron Pigmas or Gelly Rolls) black, brown, pink
    • colored pencils for lips and "eye shadow"
    • powder blush
    • white acrylic paint
    • plastic lid for inner soles
    Please read through instructions before you begin.
    Pattern Notes: 
    • Set your machine to make small stitches for strength. Back stitch at the beginning and end of each seam to prevent it from coming apart when pieces are turned.
    • RST = right sides together
    • RSO = right sides out
    • Click HERE for Pattern.
    Templates:
    Trace the body, 2 arms and back head onto the dull side of freezer paper. Be sure to include all of the pattern markings. Cut out the templates and iron them shiny side down to the wrong side of your folded fabric. Sew around the paper, then lift off. The templates can be reused quite a few times.
     
    Body:  Iron body template to wrong side of folded body fabric. Sew around, leaving open where indicated. Remove template and cut out pieces forming a scant 1/4" seam allowance. Clip curves, turn body right side out and stuff firmly. Sew opening closed.
    Arms:

    1. Sew the long edges of a 2"x15" piece of fabric for the hands to a piece 4"x15" for the sleeves, press the seam allowance toward the sleeve and fold the completed piece in half RST. Hold the seam in place with a few pins. Position the templates so that the line at the wrist rests on the seam line. Sew around the hands with matching thread. Sew around the rest of the arm with thread to match the arm fabric leaving an opening where indicated.

    2.  
    3. Loop each pipe cleaner in half, twisting the ends together. Insert the looped ends into each hand as shown. Bend the remainder of the pipe cleaner to conform to the shape of the arm. Stuff the arms firmly, placing the stuffing on both sides of the pipe cleaners. Sew opening closed.
    Skirt:
    1. Cut out 2 skirts and sew around RST leaving it open at the top. Turn right side out. Fill skirt with the 14 tablespoons of plastic weighting pellets. The skirt will be about half full.

    2.  
    3. Turn top edge of skirt under 1/4". With a double thread, hand gather top edge of skirt. Place the skirt over the body matching the side seams. Adjust gathers and sew skirt securely around waist.
    Head/Face:
    1. Trace face pattern onto the dull side of freezer paper. Iron the shiny side of the paper to a rectangle of the face fabric. Do not actually cut out the face until you are finished coloring it in. Use a light source to lightly trace the features onto the face fabric either with a mechanical pencil or brown pigma pen.

    2.  
    3. Color in irises with desired color. When the color has dried, outline the iris with a darker color or black.

    4.  
    5. Optional: Add some white on either side of the iris.

    6.  
    7. Add the pupils with black paint or pen then draw a line over the eye and add a few lashes.

    8.  
    9. When the eyes have dried you can color in some eye shadow with colored pencil. Deepen the line of the eyelid by adding more brown pigma.

    10.  
    11. Form the eye brows with tiny strokes in a color to match the hair.

    12.  
    13. Outline the lips, then fill them in with color of choice making the top lip darker than the bottom lip.

    14.  
    15. Use white paint to add the "life lights" by making a tiny white dot on the upper left side of each eye, and stroke a line on the right side of the bottom lip.

    16.  
    17. Use a Q-tip or small brush to apply powder blush to cheeks.

    18.  
    19. Iron back head template onto wrong side of folded face fabric with the template placed on the bias. Sew the center back seam leaving an opening where indicated. Keeping the template on the fabric, cut out back head along the side edge of the pattern and a scant 1/4" away from the center back seam. Remove template and baste down seam allowance around back opening.

    20.  
    21. Sew face to back head RST leaving it open at the top. Turn RSO. Stuff head firmly. Gather up top raw edge with doubled thread and knot off securely. Add more stuffing through back of head if necessary.

    22.  
    23. Insert neck into back head opening and securely stitch the head to the neck.
    Embellishments:
    1. Sew or glue ruffled lace around neck to create a collar. Sew more ruffled lace around bottom of sleeve to cover the seam where the hand joins the sleeve.

    2.  
    3. Sew or glue gold trim over the gathered edge of the lace on the sleeves. Add gold trim at the waist to cover the gathering stitches and create a belt. 

    4.  
    5. Add a button brooch, ribbon bow, or lace motif to the neck to finish the bodice. You can also add tiny gold beads to create a button-down blouse look. 
    Feet:
    1. Trace 2 feet onto the wrong side of one layer of skin fabric. Using a light source to see the outline of the foot, baste decorative ribbon or trim across the front of the shoes on the right side of the fabric. Put the skin fabric and the sole fabric RST and sew all the way around the outline of each foot. Cut out each foot forming a 1/8" seam allowance. Carefully slit the top of the foot where indicated and turn the feet RSO.

    2.  
    3. Use the foot pattern to cut out 2 inner soles from the plastic lid. Cut inside the lines to make them slightly smaller. Insert an inner sole into each foot, then stuff foot firmly and slip stitch opening closed.

    4.  
    5. Place the slit on the top of the foot against the seam line at the bottom of the skirt on either side of the center and securely sew the feet in place.

    Attaching arms:
    Attach arms to angel by securing a doubled upholstery thread with a tail on one side of the body at shoulder. Bring thread through the body, through an arm, through the gold bead, through the E bead, back through the bead, through the arm and body and the second arm, through another bead and E bead, and back through the bead and arm. Pull thread tight and knot it to the original thread tail. Bury thread ends in doll. Decorative buttons could be used in place of the beads.
    Hair:
    1. If using mini curls, rub them between hands to make them fuller and remove some of the shine. Place glue on the head and press curls in place. You may wish to use a little glue to keep the hair against the sides of the head.

    2.  
    3. If using yarn, create a multiple yarn loop twice as long as finished hair. Tie in middle. Glue to head and arrange as desired. You can add a yarn braid, twist in a bun, or leave long and loose.
    Embellishment: - Halo
    Using your 12" wired ribbon, gently pull one wire from both ends until ribbon is tightly gathered. Twist ends of wire together to form circle.  Glue or sew in place on back of head.  Posing the Doll: To place the angel in a kneeling position, fold the skirt under just before it bells out making sure that there are pellets above and below the bend. She can also be seated. Hold her upside down so that some of the pellets go around her hip area. Just have fun playing with her for a few minutes until you find the position you like best.

    Bacon Ornament (xmas ornament)


     I realized I wanted some real-life bacon Christmas ornaments! So, After a few attempts, I came up with a way to make them resemble bacon while making them nice enough to hang on the tree! You can make multiple decorations for your tree, or make one as a Christmas gift to give to a bacon-loving friend! It makes a finished piece about 5 x 2″ with a 3.5″ ribbon to hang it.

    Materials

    • Red Felt
    • Color 2 Felt (White, Beige or Pink)
    • Red Thread
    • Thread that matches Color 2
    • Wire (about 18″ per decoration)
    • Ribbon (8″ per ornament)
    • Print out of this pattern

    Tools

    • Pins
    • Needle
    • Scissors

    Optional:

    • Sewing Machine
    • Googly Eyes
    • Black Beads (for eyes)
    • Black Felt (for mouth)
    • Glue
    • Fiber Batting
    • Liquid Smoke (to give it a nice bacony smell)

    Instructions

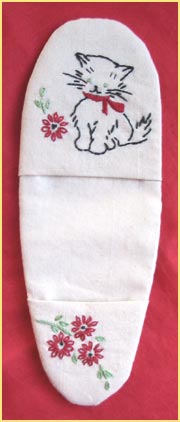
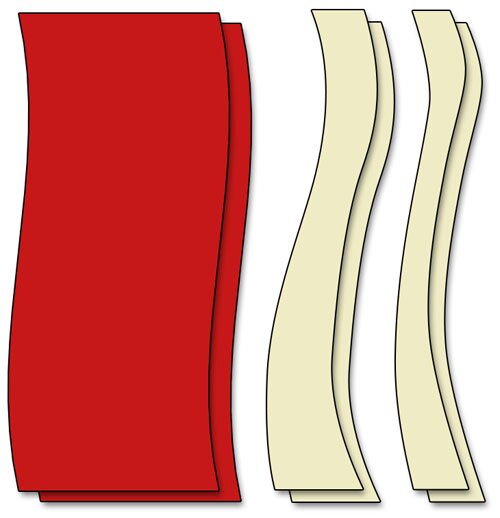
    1. Cut out the six pieces of felt. The red pieces of felt should be about 2.5 inches x 5 or 6 inches. You can use this pattern, or improvise with your own shapes.
      Make sure the two red pieces of felt match in shape so that they can be stitched back together.)
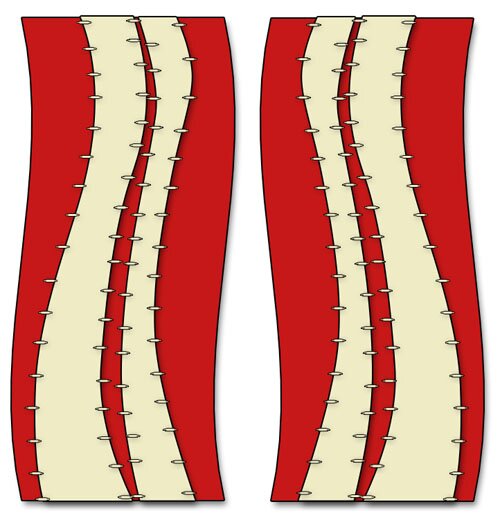
    2. Using Pins to hold them in place, stitch the Color 2 pieces onto the red felt using a overcast stitch.  I made the stitch very wide to add to the ripply look of bacon. (Is it weird that I’m getting hungry now?)
      Remember to stitch on the right sides of the felt! The pieces should look mirrored after they are stitched.
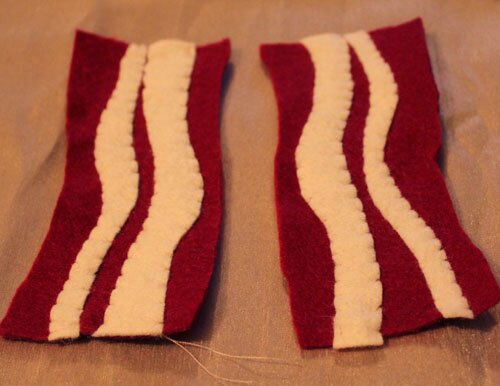
    3. Fold your ribbon in half and sandwich it between the stitched pieces of felt. The sides with the stitched designs (the ‘right sides’) should be facing inward. Pin them together.
      Make sure to leave the ribbon sticking out a bit to make sure it’s caught by the stitching.
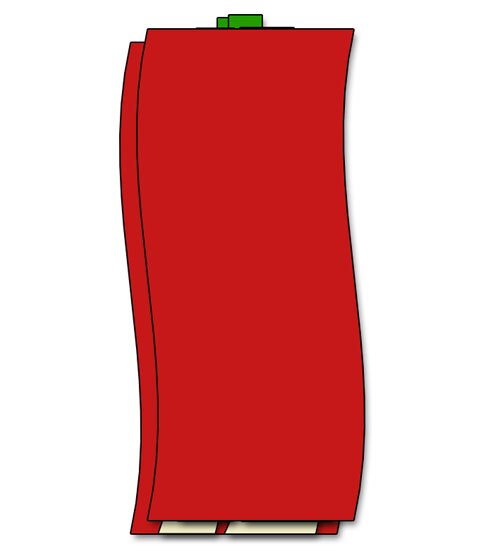
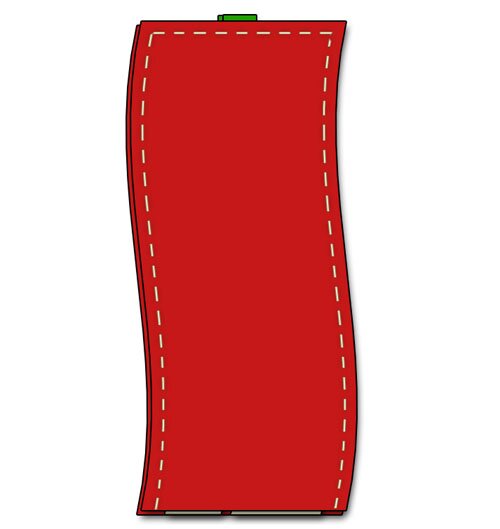
    4. Stitch the sides and top, and leave the bottom open. Make sure to stitch right through the green ribbon.
      Be sure to backstitch the seams so they don’t unravel while you turn it inside out!
    5. Turn the piece inside out by pulling the ribbon through the bottom.
      Try not to stress the opening too much when you turn it inside out.
    6. Create a rectangle of wire that will fit inside. Make it big enough to stay at the edges.
      You can put a bit of cotton batting in to puff the piece a little. If you want to give the ornament a bacon-y scent, put a drop of liquid smoke on the batting and roll it around to distribute it through the fiber before putting it inside.
      Make sure the wire is twisted and tucked around itself so that it can’t poke or scratch anyone.
    7. Tuck in the bottom seam and use a ladder stitch to close it. (Unfortunately I didn’t get a picture of this step. Here’s some directions on how to do a ladder stitch: http://www.mimidolls.com/DCC-Techniques/ladder/ladder.htm
    8. Bend and fold the wire and crumple the bacon a bit to give the edges a nice curl.
    9. All done! If you like, add googly eyes black beads for eyes or ribbon to decorate it a little more.
    Well, that’s it! Please feel free to post any comments about this! And I love to see finished pieces!.