Tuesday, December 24, 2013

Zipper Christmas Ornament


One of the many times I was standing in the long line at JoAnn's, I was lucky enough to be right by their idea table. I stared at the zipper ornaments so much that I had to come home and make a couple.


To make two trees, you just need one zipper that you take apart and some beads. I used a 22" zipper.


Then all you do is wind your zipper in loops and hot glue a bead in between. I added a bead to the bottom for the trunk and made a loop with the zipper at the top.


Add a ribbon through the loop to hang.


Now all I need is the tree to be put up to hang these beauties. Any volunteers?
 

Peppermint Ornament

Personalized Peppermint Christmas Stocking Ornaments!
(Easy Christmas Craft Using Starlight Mints)
Have you hung your Christmas stockings yet? It's one of my
    favorite holiday traditions. Growing up, we didn't actually hang ours. Mama and Daddy laid them out on the sofa on Christmas Eve...and they weren't really even stockings. They were white tube socks. I can still see them laying there on Christmas morning as we ran into the living room after having begged our parents to get up before the crack of dawn! They always had a tangerine and orange..I can still smell them. We would buy them by the case every Christmas at the Farmer's Market. There were also unshelled pecans and other nuts, and then our favorite..a couple of candy bars! I remember getting a Snicker bar every year. Such wonderful Christmas memories...I'm excited about making new ones this Christmas with my children and grandchildren. :o)

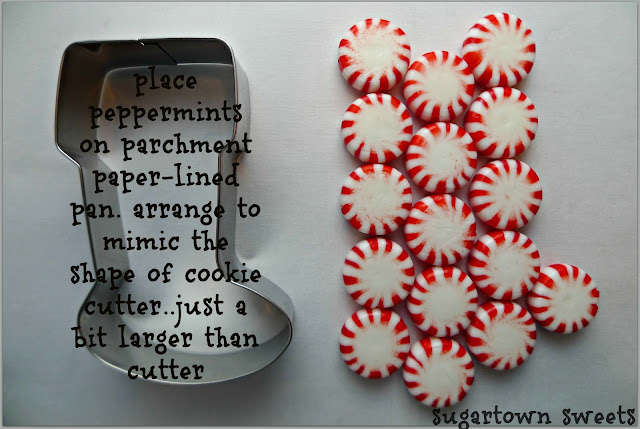
You will need peppermints, red fondant, stocking cookie cutter, foodwriters pens, parchment paper, holly mix sprinkles, corn syrup and twine for these easy melted peppermint stocking ornaments.


 While candy is melting, prepare your cookie cutter. I wish I'd have had at least a couple..next time I will. Baking one at time just takes a little longer.
Immediately press prepared cookie cutter into melted candy. Wait about 3 minutes and press a lollipop stick into candy to make a hole for twine or ribbon. At the 4 minute mark, the candy should be cool enough for you to remove the cookie cutter. I lift the candy and gently press the cutter completely through. It's still pliable at this point, so be quick to lay it flat on the parchment to finish cooling.
**edit** for an updated (and just plain better) technique for making the "ribbon hole" in ornament..click here. It worked perfectly on my Peppermint Mittens Ornaments!
 So Easy! Just let the fondant dry completely before writing on it or threading the twine.
 I decorated mine with holly and berries. Just dab a little corn syrup on the candies and place on stocking.
You will be doing this too if you don't make the hole in cuff large enough!
Sweet stockings..all finished!
 What are some of your favorite Christmas memories? I'd love to hear them. :o)
Wishing You a Sweet Day From
Sugartown Sweets!
 
 
I found this on: www.sugartownsweets.com
 

Monday, December 16, 2013

Glitter-Striped Shell Ornament


Materials

  • Tun shell (seashellcity.com)
  • Glue pen
  • Glitter (Martha Stewart Crafts, from Michaels)
  • Metallic cord
  • Hot-glue gun
  • 1 pearl bead                                                           

Steps

  1. Step 1

    The natural spots on a tun shell provide the "dots" on these ornaments. Using a glue pen (ours appears blue but dries clear), work in sections to add stripes to shell. 
  2. Step 2

    Sprinkle with glitter; gently tap to remove excess, and let dry. 
  3. Step 3

    Make hanging loop from metallic cord: Hot-glue knotted end of loop to inside tip of shell. Slip 1 pearl bead over loop, and secure in place with a dot of glue.


Felt Angel Bear Pocket


Materials:
1 piece 4" X 6" white
1 piece 4" X 6" tan plus
1 square tan felt
1 piece 1" X 12" burgundy (red) felt
One 8mm jingle Bell
Burgundy or red gold, dark green and black embroidery floss
Acrylic paint in green, holly red, black and white
Hot glue and glue gun or craft glue
Small amount of stuffing
Paint brush 
Embroidery needle Read all instructions carefully before beginning. The pocket ornament is worked by hand using blanket stitching. You may machine stitch around outer edge. Just be sure to pin pieces together to hold as you stitch. Matching thread seems the best way to go for effect.
Blanket Stitch
 
diagram of blanket stitch
Diagram of the Blanket Stitch
  1. For the decorative finish along the edge of the ornaments, use a blanket stitch using two strands of embroidery floss.
  2. Beginning on the underneath side, come up to the right side of the work. Work the stitches about 1/4" apart and in depth as you work all the way around to your beginning point. Remember to leave an opening for stuffing.
  3. With right side of the fabric up, working from left to right, with the right side of the edge toward you, hold the thread with the thumb and insert the needle from the right side, catching the top edge of the piece you are working with, then bring it out from under the edge and over the thread. Draw the thread through by pulling it toward you forming the blanket stitch. Do not pull the thread too tightly.
Bear Pattern
Bear
  1. Cut bear, muzzle and pockets of tan felt, wings of cream.
  2. Using 3 strands red floss work blanket stitch across the top of pocket. Work holly berries and leaves. Berries are 3 strands red worked in 3 French knots. Leaves are a daisy stitch each side of berries of green floss. Or you might prefer to dot berries of red acrylic paint with paint brush end and leaves of green acrylic paint and small tip brush. Let dry.
  3. Place muzzle on bear face and work small blanket stitch around muzzle with 2 strands gold floss. Dip end of paint brush in black paint and dot nose. With gold, 2 strands outline stitch ear markings.
  4. Using 4 strands black floss run muzzle center from nose tip to lower muzzle center. Secure thread.
  5. Blush cheeks.
  6. Dip paint brush end in black paint and dot eyes. Let dry. With dotter dipped in white paint, highlight one side of each eye. Let dry. 
  7. Place body front and back together. Place pocket over lower bear body front. Pin together. Work blanket stitch all around using 2 strands gold floss leaving side opening where shown for stuffing.
  8. Lightly stuff bear being sure to stuff feet, arms and ears.
  9. With 2 strands red floss work blanket stitch around wings. With 2 strands green floss work small running stitches just below blanket stitches. Using 2 strands gold floss make 3 stars each side of wings as shown on pattern piece. Make a "+", go through this with an "X
  10. Glue wing to back of bear at neck. Make a small stitch at neck center front through all thicknesses and pull to tighten. Secure thread. This gives the bear a puffier look.
  11. Tie a bow with cranberry felt, 1 & 1/8" X 12". Trim ends. Glue bow to neck center front. Glue 8mm gold jingle bell to bow center. 
  12. Run crochet thread through center back head. Tie a knot. Pull thread ends and knot at the end for hanger, if desired.

Christmas Stocking Tree Stand


MATERIALS

Branches
round wood dowels cut to the following lengths:
26", 22", 18", 14", 10"
We used a dowel of 1/4" diameter. The thickness of the dowel is your choice, but it must fit through the main post and it must be strong enough to hold your stockings when they are full. If your stockings will be heavy, you may want to use larger dowels for the branches, a larger trunk, and slightly larger base.

Trunk (main post)
One wood dowel of 1" diameter, cut to about 68" length.

Base
Cut a 2" x 4" board into two sections that each measure about 2 feet. Cut two more squares from the 2" x 4" board that measure 4" x 4".

Other Materials
Drill, saw, glue, nails, hammer
Paint
Paint brush
Glitter and other decorative items of your choice

ASSEMBLY

Tree
1.   Measure down about 6" from the top of the trunk and mark the spot with a pencil.

2.   Measure 24" from the bottom of the trunk and mark the spot with a pencil.

3.   Measure the distance from your top mark to your bottom mark and divide by four. At equal distances from one another (which is the number you got by dividing by 4), make three marks between the top and bottom mark.
4.   Your shortest branch will be at the top, and each branch down gets longer. Your longest branch will be on the bottom of the trunk. Drill a hole for each branch, drilling each hole PERPENDICULAR to the one before it. Hole should be a size that creates a tight fit for the dowel. We drilled each hole to 1/4" and then sanded the dowel just enough so it would fit through tightly.

5.   Push your branch through the hole.


Base
1.   Glue or nail the two base squares onto the underside of one of your base cross pieces, even with the ends, to serve as "feet". (refer to photo).

2.   Glue or nail the two base cross pieces together, with the piece with feet on top, and with the two pieces perpendicular to one another.

3.   Drill a hole into the center of one of your base pieces, large enough to accomodate your trunk.

4.   Glue or nail your trunk into the base.
NOTE: You can change the dimensions of your tree, but be sure that the base is large enough to accomodate the tree when fully loaded. If your base is not wide enough, your tree will tip over!


Shovel Door Decoration


Christmas Craft Project - Shovel Door Decoration

Materials: 1 Provo Craft® shovel (available at craft supply stores); 1 lg holiday sprig of choice; 5 to 6 miniature pine cones; white glitter spray paint or spray snow; 1 pkg. Plastifoam® white balls - 1 1/2"; glue gun and sticks; red berries.

Instructions:

1. Glue holiday spring lengthwise along front of shovel handle 1ith foliage end facing downward.

2. Glue Plastifoam® balls on base of shovel in pile as shown in photo above.

3. Spray pine cones with snow or white glitter paint, allow to dry thoroughly.

4. Arrange pine cones on handle as desired and glue in place.

5. Glue tips or stems of berries and place between pine cones


String-Light "Wall" Tree with Felt Star Ornaments

In a child's room or a hallway, a string-light tree is as festive as an evergreen.
To create one, use adhesive hooks (four along the bottom, one at the top) to hang lights in the shape of a Christmas tree. Felt star ornaments add to the twinkle effect -- ivory and white are particularly chic, but you can make them in any color. 

Materials

  • Star templates
  • Wool felt, 18 by 18 inches, by Ecrue                                                          
  • Ribbon
  • Mini white lights, 2 1/2-inch spacing, 50-light strand (used for tree's interior)                                      
  • Mini white lights, 2 1/2-inch spacing, 100-light strand (used for tree's perimeter)                                                         
  • Adhesive mini hooks, in Clear, by Command                                                          
  • Floral wire

Steps

  1. Step 1

    Print star template.
  2. Step 2

    Iron 2 pieces of felt together with iron-on fusible interfacing.
  3. Step 3

    Trace star onto felt, and cut out.
  4. Step 4

    Sew a loop of ribbon through the top of each star, and hang on tree with floral wire.

Decoupage Holiday Ornament


Tear out photos, designs and words to decoupage a holiday ornament. Make sure to select some paper in holiday colors for your ornament.  


Materials:

  • Tulip® Fashion Glitter™ 23554 Red Fine Jewel
  • Collage Pauge Instant Decoupage™
  • Aleene's® Original Tacky Glue®
  • Photo
  • Decorative papers
  • Paper towels
  • Foam brush
  • Foil
  • Glass ball ornament


Instructions:

  1. Cut or tear words or special designs from papers you wish to be predominate on ornament.
     
  2. Cut or tear additional pieces until there are enough to cover ornament. If paper is torn it will leave a ragged white edge, which will make it look more like a collage.
     
  3. Cover work surface with paper towels. Shake bottle of Collage Pauge well. Squeeze a puddle onto foil. Working in a small area at a time, quickly brush Collage Pauge onto ornament and onto back of a strip of paper. Smooth paper onto wet glue on ornament. Brush a coat of Collage Pauge over paper. Dip fingers into water. Smooth out any air bubbles, starting at center and working outward in a circle.
     
  4. Repeat procedure until ornament is covered. Repeat procedure to add words or special designs.
     
  5. Apply a coat of Collage Pauge. Let dry, we recommend hang dry.
     
  6. Embellish with glue, sprinkle with glitter.


Snowman Glass Ornaments


For Christmas, you're probably looking for the perfect craft. These Snowman Glass Ornaments will be a lovely addition to your holiday decor. They would also make a great gift.


Materials:

Plaid Supplies-

  • 4006 - FolkArt ® Enamels™ - Engine Red, 2 oz.
  • 4008 - FolkArt ® Enamels™ - Pure Orange, 2 oz.
  • 4032 - FolkArt ® Enamels™ - Licorice, 2 oz.
  • CS11301 - Mod Podge ® Matte, 8 oz.

Other Supplies-

  • Silver chenille stems
  • White & light blue felt sheets
  • Scalloped pinking shears
  • Glue
  • Scissors
  • Fine point black marker
  • Coordinating fabric
  • 1/8” stencil brush
  • 1/2” flat brush
  • #1 liner brush
  • Frosted glass ball ornaments

Instructions:

  1. Paint faces as shown. Create cheeks using very dry stencil brush.
     
  2. Cut donut shape out of white felt to fit over bottom of girl ornament. Use scalloped pinking shears on outer edge. Write name with marker then glue to bottom of ornament. Wrap chenille stem around neck & secure with glue. Wrap & twist stem around top of ornament to form bow.
     
  3. Cut small donut shape out of blue felt to fit over top of boy ornament. Cut small strip of felt for top of hat.
     
  4. Write name with marker & glue to inside of inner circle.
     
  5. Glue chenille stem around hat then glue to top of ornament.
     
  6. Apply Mod Podge to fabric length, folding over three times to form approximate 3/8” strip. Form into a ring with a scarf-fold end. Insert bottom of ornament into ring & glue into place. Let dry completely.


FIREPROOFING CHRISTMAS TREES

FIREPROOFING CHRISTMAS TREES

Into 1 gallon water mix

1 cup ammonium sulphate (available from garden supply store)
1/2 cup boric acid (available from drugstore) and
2 tablespoons borax (available from grocery or hardware store)
Mix well. Pour into a spray bottle. Spritz on tree and pour the remainder into the tree stand instead of in water.

Sunday, December 15, 2013

Snowman Tree Decor


Add to your collection of snowmen. This snowman tree decor is a perfect decoration for the Christmas holiday. You can make it as a gift too. Garland, beads and glitter make this one heck of a craft. It's quick and easy too.


Materials:

  • STYROFOAM* Brand Products:
    • Cone, 12"
    • Balls: 1", 72; 1-1/2", 18; 2", 18
  • Pom poms: 1/4" white (noses), 18; 1/4" assorted (buttons), 36; 1/2" assorted (earmuffs), 36
  • Tinsel stems, assorted colors (headbands), 2-1/2" length for each snowman
  • Metallic silver tree garland, 15 ft.
  • Ultra fine white iridescent glitter
  • 8mm black beads, 36
  • 1/2"-1" satin or grosgrain ribbon, assorted colors (neck bows)
  • 1/4" metallic curling ribbon: silver; assorted colors
  • Pink acrylic paint
  • Liner paintbrush
  • Ruler
  • Scissors
  • Serrated knife
  • Wooden skewers
  • Pink chalk or powdered blush
  • Cotton swab
  • Disposable palette
  • Paper towels
  • Wooden toothpicks
  • Florist wire
  • Wire cutters
  • Thick, white craft glue; low-temperature glue gun and glue sticks


Instructions:

Assembly:

  1. Cut a small slice from one side of a 1-1/2" foam ball to flatten. Press and twist flat side of 1-1/2" ball onto a 2" ball until snug. Glue pieces together, forming snowman's head and body.
     
  2. Using photo as a guide, press four 1" balls onto sides of 2" body near top and bottom for arms and legs. Glue pieces together.
     
  3. Push a wooden skewer into center back of snowman to serve as a handle. Coat entire surface of snowman with white glue. While glue is wet, sprinkle glitter generously onto snowman to cover. Gently press glitter into glue to adhere. Let dry and then remove skewer.


Decorations:

  1. Glue two black bead eyes and one 1/4" white pom pom nose to snowman's head.
     
  2. Using dark pink paint and liner brush, paint a tiny smile on face. Let dry.
     
  3. Brush pink chalk or powdered blush on cheeks with a cotton swab.
     
  4. Glue two matching 1/4" pom poms down center front of body for buttons.
     
  5. Tie satin or grosgrain ribbon in a bow around snowman's neck. Trim ends at an angle, leaving short streamers trailing down tummy.
     
  6. Cut a 2-1/2" length of tinsel stem and bend into a U shape for a headband. Place headband on snowman and then glue two matching 1/2" pom poms over ends for earmuffs.
     
  7. Cut a 10" length of metallic curling ribbon and tie in a small bow around snowman's neck. Loosely curl ribbon with a scissors blade.


Topiary:

  1. Cut several 1" lengths of floral wire and bend into U shapes.
     
  2. Cover foam cone with metallic garland, pressing U-shape wires over garland and into foam to secure.
     
  3. Press a toothpick halfway into back of snowman and then press opposite end into foam cone. Repeat to attach each snowman to topiary, using photo as a guide for placement. Glue curls of metallic ribbon to topiary, filling in between snowmen as desired


Jingle Bell Hats for the Family


Check out these Christmas hats to knit for the whole family! Think how fun it will be to wear the jester hats for your Christmas card photo, to the holiday parade, and everywhere else this Winter.


Hat Circumference: 16 (18½, 21¼)". Directions are for Children, changes for Women and Men sizes are in parentheses.

Materials:

  • RED HEART® “Super Saver®”: 1 Skein 319 Cherry Red (Child) or 376 Burgundy (Women) or 368 Paddy Green (Men).
  • 16" Circular Knitting Needles: 4.5mm [US 7].
  • Double Pointed Needles: 4.5mm [US 7].
  • 3 Stitch markers.
  • Yarn needle.
  • 3 jingle bells per hat.
  • Sewing needle and thread.


GAUGE: 18 sts = 4"; 24 rnds = 4" in St st. CHECK YOUR GAUGE. Use any size needles to obtain the gauge.

Instructions:

With circular needle, cast on 68 (80, 92) sts. Join to work in the round making sure that sts are not twisted and place a marker between first and last sts.
Rnd 1: * K2, P2; repeat from * around.
   Repeat Rnd 1 for ribbing for 4½ (5, 5)".
K 1 rnd, inc 4 sts evenly spaced – 72 (84, 96) sts.
Work even in St st for 3 (3½, 4½)" – 7½ (8½, 9½)" from beginning.
Increase Shaping: [K 24 (28, 32), place marker on needle] twice, K 24 (28, 32) to marker at end of rnd.
Rnd 1: K, inc 1 st before and after each marker – 6 sts inc in rnd.
Rnd 2: K.
   Repeat Rnds 1 and 2 8 (9, 10) times – 126 (144, 162) sts.
Divide and Shape Points
First Point:
Place first 42 (48, 54) sts onto a dpn; leave remaining sts on the circular needle.
Note: Points will measure about 6 (7, 8)" from base to tip. To make points longer or shorter, adjust the number of rows between decrease rows.
Rnd 1: [K5 (6, 7) K2tog] 6 times – 36 (42, 48) sts.
Rnds 2-6: K.
Rnd 7: [K4( 5, 6) K2tog] 6 times – 30 (36, 42) sts.
Rnds 8-12: K.
Rnd 13: [K3 (4, 5) K2tog] 6 times – 24 (30, 36) sts.
Rnds 14-18: K.
Rnd 19: [K2 (3, 4) K2tog] 6 times – 18 (24, 30) sts.
Rnds 20-24: K.
Rnd 25: [K1( 2, 3) K2tog] 6 times – 12 (18, 24) sts.
Rnds 26-30: K.
Rnd 31: [K0 (1, 2) K2tog] 6 times – 6 (12, 18) sts.
Rnds 32-36: K.
Sizes Women and Men Only-Rnd 37: [K (0, 1) K2tog] 6 times – (6, 12) sts.
Rnds 38-42: K.
Size Men Only-Rnd 43: [K2tog] 6 times – 6 sts.
Rnds 44-48: K.
All Sizes: Cut yarn, leaving a 6" tail. With yarn needle, weave yarn tail through remaining sts; draw up firmly; fasten securely.
2nd Point: Place next 42 (48, 54) sts onto a dpn; leave remaining sts on the circular needle and work same as for First Point.
3rd Point: Place last 42 (48, 54) sts onto a dpn and work same as for First Point.

FINISHING: Weave in ends. With sewing needle and thread, sew a bell to each tip. Turn up half of ribbing for cuff


Bearded Santa Ornament


Use fresh, rather than traditional colors, to create a Santa Claus ornament with a wonderfully textured beard. This would make a great gift at the holidays.


Materials:

DecoArt Products Required
Americana Acrylics

  • DAO1 - Snow (Titanium) White
  • DAO67 - Lamp (Ebony) Black
  • DAO78 - Flesh Tone
  • DA151 - Royal Fuchsia
  • DA235 - Citron Green
  • DA236 - Grape Juice

Snow-Tex

  • DAS9 - Snow-Tex

Winter Wonderland Kit

  • DASK220 - Americana Winter Wonderland Kit (paints included)

Supplies

  • Wood santa ornament


Instructions:

1. Paint as follows: Hat and berries, Royal Fuchsia; hat trim, Grape Juice; face, Flesh Tone.

2. Mix Flesh Tone and Royal Fuchsia and use for nose.

3. Dot in eyes with Lamp Black.

4. Paint holly leaves Citron Green.

5. Stripe hat and highlight with Titanium White.

6. Use Snow-Tex for beard and mustache. Let all dry.

7. To finish, apply Crystal Twinkles as desired.


Antique Angel Ornament or Wall Decor


This antique holiday angel is made with inexpensive foam painted with a faux rust finish. Hang from metallic ribbon for a beautiful tree ornament or use as wall decor.


Materials:

  • 1 sheet 18" x 12" x 1/2"STYROFOAM™ Brand Foam
  • Faux finishes: iron; rust
  • Wire-edged metallic bronze ribbon, 1/2" x 1/2 yd.
  • Water-based acrylic primer
  • Water-based acrylic sealer (optional)
  • Fine-line black permanent marker
  • Pencil with dull point
  • Ruler
  • Scissors
  • Utility knife and several new blades or serrated knife
  • Old candle
  • Disposable palette
  • Water basin
  • Paper towels
  • Stiff-bristled paintbrush
  • Disposable sponge brush
  • Low-temp glue gun and glue sticks
  • Pattern


Instructions:

  1. Use marker to trace pattern outlines onto foam sheet; details will be added later. Carefully cut along traced lines with sharp utility knife or serrated knife. Wax the knife blade first with an old candle for smooth, easy cutting. Note: When cutting around a tight curve, first make several cuts from traced line out to edge of foam sheet; continue cutting along curve, removing small foam sections one at a time. Sand rough edges with a scrap piece of foam.
     
  2. Use pencil tip and medium pressure to indent line that separates wings. Use pencil eraser or fingers to gently indent foam in area inside crook of arm.
     
  3. Use stiff brush to apply one coat primer to front and edges of angel. Let dry.
     
  4. Use disposable brush to apply two to three generous coats of iron finish to all primed surfaces. Follow manufacturer's instructions for drying time.
     
  5. When dry, use disposable brush to apply one to three coats of rust finish over iron finish. More coats result in more "rust"; apply as many as needed to achieve desired effect. Follow manufacturer's instructions for drying time.
     
  6. If desired, use disposable brush to apply one coat sealer to angel. Let dry completely. Note: Sealer will change color of final finish; model pictured did not use sealer.
     
  7. Knot center of ribbon and glue knot to top center back of angel. Tie ribbon ends in a bow as shown.


Peppermint Stripes Guardian Snow Angel


Who wouldn't find this red and white striped holiday angel a joy to create? She's so sweet and she'll watch over all your loved ones this Christmas season.  Create for a friend or as a lovely addition to your handmade Christmas decor.


Materials:

  • STYROFOAM™Brand Foam:
    • Ball, 2 1/2"
    • Egg, 6"
  • Fleece, 10" x 16", White
  • Red/white fabrics: striped, 6" x 12"; checked, 2" x 4"
  • Sparkle felt, 9" x 12" sheets: red, one; white, two
  • Textured sparkle fibers, 1 yd. each: red; white
  • Scissors
  • Red pom pom, 1/4"
  • White buttons, 1/4", two
  • Black beads, 8mm, two
  • Clear alphabet stickers: J; O; Y
  • Ruler
  • Serrated knife
  • Candle stub or paraffin
  • Pencil
  • Cosmetic blush
  • Compass or 1" circle template
  • Embroidery floss, Red
  • Embroidery needle
  • Low temperature glue gun and glue sticks
  • White, Thick craft glue
  • Pattern


Instructions:

  1. Wax serrated knife with candle stub or paraffin. Cut thin slices from opposite ends of foam egg and one side of foam ball. Glue flat side of ball to narrow end of egg for head.
     
  2. Clean stray bits of foam from work surface before cutting fabrics. Cut pattern pieces as indicated. For wings, cut two from white felt on outline; cut one from red/white striped fabric on dashed line. In addition, cut 10" x 11" rectangle from fleece and three 1" circles from red/white checked fabric, paying attention to position of checks. Glue fabric circles to remaining red felt; trim felt just outside fabric edges.
     
  3. Evenly wrap fleece rectangle cut in Step 2 around foam head/body, overlapping fleece edges at back; glue fleece edges to secure. Gather fleece evenly at top and bottom, pulling tight; glue fleece to foam to secure. Trim excess fabric.
     
  4. Wrap and glue collar tightly around neck to shape head. Glue buttons to collar.
     
  5. Refer to photo to create face. Use scissors point to make two holes for eyes in foam, 3/8" apart. Glue beads in place, pushing firmly into holes. Glue pom pom nose to face. Use fingertip to apply blush to cheeks.
     
  6. Use three strands red floss to stitch small, v-shaped mouth. Bring embroidery needle from bottom of head, through foam ball, to face. Stitch mouth through fleece only. To finish, take floss back through foam ball to bottom of head; knot and clip thread.
     
  7. Glue sleeve and mitten pieces together in pairs. Refer to sleeve pattern for mitten placement. Glue sleeves to sides of body under head.
     
  8. Glue felt wings together; center and glue striped wing on top. Glue center of wings to back of head.
     
  9. Adhere "JOY" letter stickers to fabric/felt circles. Tie small bow with tails from red and white fibers. Glue red fibers around edge of each "JOY" circle. Glue circles to bow tails. Glue bow to mittens.
     
  10. Twist fibers together and wrap around top of head for halo; glue to secure.


Homemade Sugar Scrub and Embellished Bath Jar


Make your own sugar bath scrub and personalized bath jar with this tutorial. This combination makes a lovely gift for Mother's Day or any special occasion.


Materials

  • Sizzix Big Shot
  • Sizzix Big Alphabet Set 4 Dies - Go Slim Lowercase
  • Sizzix Sizzlits Die 3-pack Summer Fruit Set #2 by Emily Humble
  • Scrapbook paper – coordinating colors and patterns
  • Paper cutter or scissors
  • Pencil
  • Glass jar
  • Ribbon trim
  • Sugar
  • Almond oil
  • Essential oil

Instructions:

  1. This is a quick and easy project! Mix bath scrub ingredients in bowl (recipe below) and scoop into jar. Replace lid. Clean outside of jar completely to remove any overspill residue. Set aside.
     
  2. Using your Big Shot and dies, cut lettering and strawberry. Measure and cut background paper to size to fit around glass jar overlapping seam at back. Mark front center. Lay background paper face up on flat work surface. Using front center mark to guide placement, glue lettering and strawberry onto background paper. Wrap paper around jar and glue or tape to hold.
     
  3. Measure, cut and glue ribbon to jar of lid. Wrap up for a special gift. Be sure to include a hand-lettered tag listing the sugar scrub ingredients!

Lavender Orange Sugar Scrub

  1. Mix equal parts white cane sugar and almond oil (you can also substitute with avocado oil or olive oil). Add equal drops of lavender essential oil and orange essential oil (or essential oils of your choice). Mix together in bowl and scoop into jar. When ready to use scrub, use a wooden scoop or popsicle stick to scoop contents from jar. Keep jar tightly sealed between uses.