Thursday, December 12, 2013

Mini Wreath Tutorial

What you Need:

Shower curtain rings ($1.16 for 12 @ Walmart), Yarn, ribbon or other embellishments, glue gun, scissors

DSC_2527

First, cut your length of yarn. About 4 nose-to-hand lengths is enough yarn for the wreath. If you think you will wrap tight, then do an extra arm length to see. After the first wreath you’ll get a better idea of how much yarn you may need. If you use thicker yarn you will also need less than if you are using thinner yarn.

Secure your end with a drop of hot glue

DSC_2528

Then start wrapping!

It’s easiest to bunch up all the yarn in your wrapping hand then it is to slowly pull it around and through each time.

DSC_2529

Be sure to twist & tighten, push back, and fix your yarn the way you want as you go, but it doesn’t have to be perfect unless you want it to be.DSC_2530
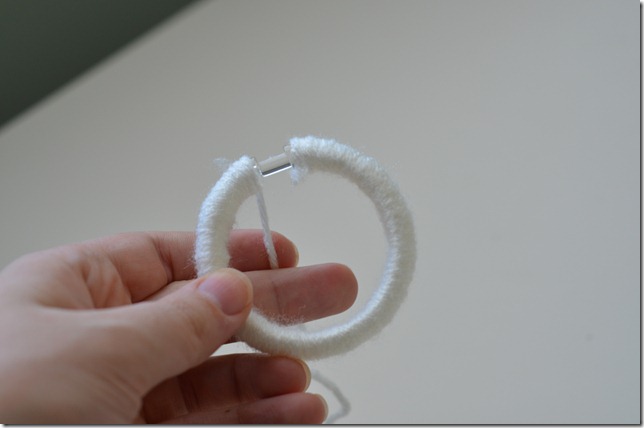
When you get to the end, just layer the yarn until the skinny part of the ring matches the rest of the ring. DSC_2532

glue down the end.

DSC_2534DSC_2535

Then tie a loop and a knot the best you can.

DSC_2536DSC_2537

Glue down the knot onto the back. *keep all your glued down parts on one side of the wreath—dedicate that side as the back of the wreath.DSC_2539DSC_2540

Then the fun part! Embellish to your heart’s desire! Most of mine I just did ribbon (be sure to singe the edges of your ribbon or will fray!)

DSC_2542

Now play around and experiment with yarn & embellishments to create different looks!

DSC_2577-2

For stripes, it may take some practice…DSC_2576

Now a little bit about thickness…

Your wreaths will take on different looks depending on the thickness of the yarn you use, and also how many times you decide to wrap the wreath.

When I started making these wreaths, I used pretty thin yarn {look at the loop to see how thick the yarn was when I started}. The more you wrap around the fatter it gets. DSC_2575

Then I started using some pretty thick yarn, which goes faster than the thin yarn and it gets nice and fat pretty quickly! You also use less yarn when its thicker and do the 2nd, 3rd, etc layers a bit looser too.

DSC_2574

That’s it! Cute project, yes? A great way to start the week! If you can keep a glue gun near you on the couch, you can get quite a few wrapped while watching TV or a movie! I hope you’ll try these, they really are cute and pretty easy

felt santa clothes christmas ornaments

felt ornaments

Materials:
Felt: 3 red and 1 white 9" x 12" scraps in gold
and black
Needle and black embroidery floss
3 strands dental floss
1 yd 20-gauge wire
Wire snips
White glue
1" x 21⁄2" red gingham
3 tiny black buttons
Instructions:
Enlarge patterns labeled “F,” found here. Cut from felt.
Stitch tiny straight stitches with 3 strands floss on white trims and cuffs.
Hangers (make 4): Cut 9" wire. Center wire along bottom of hanger pattern and bend into shape; trim excess.
Jacket: Glue cuffs and front trims to one jacket piece, brushing glue on smoothly and weighting pieces to dry. Glue trims, cuffs and collar to back piece. Glue front to back, with hanger between them at neckline.
Pants: For each of 3 pairs, glue cuffs even with lower edge to 1 piece for back and the other for front. With buckle: Glue belt, buckle and inner buckle to front, even with upper edge. Glue pants together with hanger sandwiched between. With drop drawer: Cut 3-sided drop drawer in 1 pants piece, following pattern. Glue gingham behind drawer to wrong side of other piece. Glue pants together over hanger. Sew a button to hold up right-hand top corner of drop drawer; fold left corner down and stitch. With suspenders: Glue or tack 1 end of suspenders to pants front 1⁄4" in from sides and 3⁄8" below top with button. Glue pants together. Cross suspenders, attach ends to back and slip over hanger. Hang clothes individually or from a twine clothesline as a garland.

Tip: Soak Sponges In Fabric Softener

This isn't homemade, but it stretches your softener. Get a 5 gallon bucket with a lid and add to it:
  • 1 large bottle of fabric softener
  • 2 bottles (use fabric softener bottle) water
  • 4 all purpose sponges cut in 1/2
Stir the ingredients together and when you add a load of clothes to your dryer, squeeze out 1 piece of sponge and add it to your load.After the load is dry, replace the sponge in the softener. This stretches your softener 3 times as long.

Frozen - Inspired game of tic tac toe

Handmade Tic Tac Toe game inspired by Disney's Frozen

What you'll need

  • Ten wine/champagne corks
  • Acrylic paints and brushes
  • Felt - light brown for Sven's antlers, black for Olaf's twigs
  • Fabric Glue

How to make it

  1. Handmade Tic Tac Toe game inspired by Disney's FrozenSimply paint five corks white and five corks brown and leave aside to dry.
  2.  To create Olaf, paint on the eyes, eyebrows and buttons with black paint and the nose with orange paint. Snip pieces of black felt for the twig hair and attach with the felt glue.
  3. Handmade Tic Tac Toe game inspired by Disney's FrozenTo create Sven all you need are white eyes with black dots for the pupils and snips of light brown felt attached to the head with the felt glue for the antlers
  4. Handmade Tic Tac Toe game inspired by Disney's FrozenFor the play mat I sewed some zig zag stitch lines on a piece of craft felt - a 5 minute option. You can of course just draw some lines on a piece of paper or cardboard and the fun will flow just as well. Ready to play ?
              

   .

Thursday, December 5, 2013

clothespin snowmen


These little snowman ornaments are easy to make. The kids will have a ball and can hang their creation on the tree this year, or anywhere else you choose!

You will need

wooden clothespins
1 1/8" wood circles
3/4" x 5/8" wooden spools
craft wire
ribbon or material scrap
acrylic paint in black*, white, and orange
white craft glue
small foil Christmas tree or other embellishment

* You can use a black marker instead of paint if you prefer.

What you do

Paint the clothespin with white acrylic paint. Allow to dry and repeat for a second coat. Glue the spool to the center of the wood circle. Paint the spool and circle black. Glue the dry black hat to the top of the dry white clothespin.

Cut a piece of craft wire long enough to form a hanger for your ornament (approx 6"-8"). Wrap the ends of the craft wire around the "neck" of the clothespin, creating a loop. With the wire loop at the back, wrap a scrap of material or ribbon around the neck and tie for a scarf, covering any exposed craft wire.

Using a small paintbrush, or even a toothpick, dot on eyes, mouth and buttons with black paint. Use orange for the nose and glue foil tree to the hat. Hang!

Spice Ornaments

How to make a spice ornament       

Spice ornaments are made by covering Styrofoam® balls with powdered or crushed dried spices. To create a variety of looks, the simple ornaments can be embellished with ribbons and preserved or artificial leaves or berries. For durability, the spice-covered ornaments are sprayed with an aerosol clear acrylic sealer.
You need:
• Powdered or crushed dried spices, such as nutmeg, cinnamon, oregano, mace paprika, parsley, poppy seed, crushed red pepper, allspice, mustard seed, chili powder, or dried orange peel
• Aerosol acrylic paints in colours that blend with spices
• Styrofoam balls
• 20-gauge craft wire
• 9 in (23 cm) length of ribbon or cording, for hanger
• Thick craft glue; hot glue gun and glue sticks
• Aerosol clear acrylic sealer
• Embellishments as desired
To make:
1.
Roll Styrofoam ball lightly against table to compress the Styrofoam slightly.
2. Spray Styrofoam ball with aerosol acrylic paint; allow to dry.
3. Apply craft glue to the Styrofoam ball; roll in spice to cover. Allow to dry. Apply aerosol acrylic sealer.

4. Knot the ends of the ribbon or cording together. Bend 4 in (10 cm) length of wire in half. Attach ribbon or cording to the ornament with wire as shown; secure with dot of hot glue.
5. Secure any additional embellishments to the ornament as desired, using hot glue. Try adding a mistletoe spring for a "kissing ball."

Snow People from Recycled Mittens


Snow People from Recycled Mittens
by Amanda Formaro
[]
You will need
children’s mittens
rice
cotton batting
11/4″ diameter wooden balls
buttons
mismatched infant or children’s socks
small pom poms
scrap material for scarves
silk florals (holiday springs, berries, flowers, etc.)
sleigh or basket
tiny black plastic eyes or black acrylic paint
rosey lipstick
black marker
What you do
Basic Snow Person
Fill the hand portion of a child’s mitten with one or two handfuls of rice, fill the rest of the way with cotton batting, be sure to fill thumb as well. Cut a scrap piece of material for scarf and gently tie around the mitten where the ribbing of the cuff meets the plain material of the mitten (end of the cuff). (When tying scarf, point the scarf material away from the thumb to make it appear as if the scarf is covering the person’s other arm.) Fold down cuff to cover scarf and form a turtle neck. Hot glue on wooden ball to top of turned down cuff. Glue on tiny plastic eyes or paint on with black acrylic paint. Use black marker for mouth. Gently dot on lipstick for cheeks by applying first to your finger and then dotting onto face. Glue 2 or 3 buttons to tummy area. Glue a stem of holiday florals or greenery tucked into the arm (thumb), and glue arm to the mitten body.
You can personalize each snow person with different hats, scarves, florals, and more. Our examples show how you can create an entire family of folks by simply using different colored mittens, scarves, and different styles of hats and ear muffs.
Grandpa
Our Grandpa (pictured above) wears a top hat that is fashioned from a scrap of scarf. Lay your basic snowperson face up on your work surface. Lay a rectangular scrap flat and place under ball head. Fold a flap of the material up to form the brim of the hat (see photo) and begin gluing in place, wrapping around the head as you work. Glue final seams in the back of the hat so they are not visible.
Brother & Sister
(pictured at top)
Amy and Peter are wearing snow hats. These hats are both fashioned from infant socks. To make Amy’s hat we simply fit the cuff of the sock onto her head and rolled up the edge of the cuff to form her hat brim. Then trim the end of the sock off and fold over neatly then glue in place. Glue a pom pom to the top. For Peter’s hat, put sock on head the same way as Amy’s, trim toe portion off, then cut the end of the sock into three sections. Pull those three sections together to form a cone type tip, glue three pom poms to that tip.
 
Little Sister
Little Jessica is wearing earmuffs instead of a hat. We simply cut a scrap piece from the cuff of an infant’s sock and glued it across the top of her head. At the ends of the headband, glue two pom poms for the muffs.
Mom & Dad
(pictured below)
A slightly larger mitten was used for Mom and Dad. Because the cuffs of the mittens were much larger and thicker, we formed parka hoods by simply gluing the ball inside the cuff and gluing the “chin” to the mitten itself.
You can display these snow people in a basket with sprigs of greenery and holly berries, or place them in a sleigh. Fill the sleigh with cotton batting and place each family member in their seat. Place these cute little people on your fireplace mantel, or attach a piece of gold cord and hang from your tree or in your doorway.