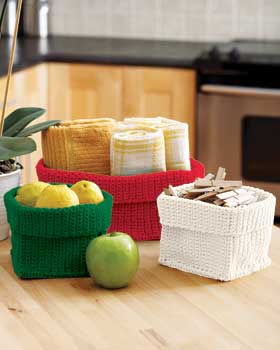
Saturday, July 13, 2013

Crochet Stash baskets (crochet)

These handy baskets  can be used to store any number of household items.  Great for the kitchen, bathroom, bedroom, and even the utility closet, these cute crochet baskets are easy to make and great for helping you keep your life organized.  These crocheted baskets would also be an adorable way to present baked goods as a gift.  Start now to have a bunch ready for the holiday season.
Crochet Stash Baskets
Materials:
  • 1 ball Lily® Sugar’n Cream yarn (70.9 g / 2.5 oz) in White (for small basket)
  • 2 balls Lily® Sugar’n Cream yarn (70.9 g / 2.5 oz) in Emerald (for medium basket)
  • 3 balls Lily® Sugar’n Cream yarn (70.9 g / 2.5 oz) in Red (for large basket)
  • Size 3.5 mm (U.S. E or 4) crochet hook or size needed to obtain gauge
  • Fabric stiffener

Gauge:  18 sc and 20 rows = 4 ins 10 cm.

Instructions:
Small: Approx 5 x 5 x 6 ins 12.5 x 12.5 x 15 cm, with top unfolded.
Medium: Approx 5 x 10 x 6 ins 12.5 x 25.5 x 15 cm, with top unfolded.

Sides:
  1. Ch 28.
     
  2. 1st row: (RS). 1 sc in 2nd ch from hook. 1 sc in each ch to end of ch. Turn. 27 sc.
     
  3. 2nd row: Ch 1. 1 sc in each sc across. Turn.
     
  4. Rep last row until work from beg measures 5 ins [12.5 cm], ending with a WS row.

Small Basket Only
  1. **Next row: (RS). (Fold line). Ch 1. Working through back loops only, 1 sc in each sc across. Turn.
     
  2. Next row: Ch 1. Working through both loops, 1 sc in each sc across. Turn.
     
  3. Rep last row until work from beg measures 5 ins [12.5 cm], ending with a WS row.**
     
  4. Rep from ** to ** twice more.
     
  5. Next row: (RS). (Joining row).
     
  6. Place foundation ch behind last row with WS of work tog. Ch 1. Working through both thicknesses, 1 sc in each sc across. Fasten off.

Medium Basket Only
  1. Next row: (RS). (Fold line). Ch 1. Working through back loops only, 1 sc in each sc across. Turn.
     
  2. ***Next row: Ch 1. Working through both loops, 1 sc in each sc across. Turn.
     
  3. Rep last row until work from last fold line measures 10 ins [25.5 cm], ending with a WS row.***
     
  4. Next row: (RS). (Fold line). Ch 1. Working through back loops only, 1 sc in each sc across. Turn.
     
  5. Next row: Ch 1. Working through both loops, 1 sc in each sc across. Turn.
     
  6. Rep last row until work from last fold line measures 5 ins [12.5 cm], ending with a WS row.
     
  7. Rep from *** to *** once more.
     
  8. Next row: (RS). (Joining row).
     
  9. Place foundation ch behind last row. Working through both thicknesses, 1 sc in each sc across. Fasten off.

Base
  1. Ch 23 (46).
     
  2. 1st row: (RS). 1 sc in 2nd ch from hook. 1 sc in each ch to end of ch. Turn. 22 (45) sc.
     
  3. 2nd row: Ch 1. 1 sc in each sc across. Turn.
     
  4. Rep last row until work from beg measures 5 ins [12.5 cm], ending with a WS row. Do not fasten off.
     
  5. Join Base to Sides: Place lower edge of Sides behind Base with WS of work tog, aligning corners of Base with fold lines and joining row of Sides.
     
  6. Next rnd: (RS). Ch 1. Working through both thicknesses, work 1 rnd of sc around all 4 sides of Base. Join with sl st in first sc. Fasten off.

Finishing
  1. Apply fabric stiffener to Baskets following manufacturer’s directions. Fold top edge to RS as shown in picture.

Checkerboard place mat (crochet craft)

Use your favorite colors and this free pattern from Bernat Yarns to crochet a contrasting checkerboard placemat.  These placemats are the perfect way to add a quick and easy burst of color and your own style to your kitchen.

Measurements:
Approx 14 x 18 1/2" [35.5 x 47 cm].
Materials:
  • Bernat Handicrafter Cotton (Solids: 50 g/1.75 oz) or (Ombres: 42.5 g/1.5 oz) or yarn of your choice.
    • Main Color (MC): 5 balls.
    • Contrast A: 5 balls.
    • Contrast B: 1 ball.
  • Size 4.5 mm (U.S. 7) crochet hook or size needed to obtain gauge.
Gauge:

20 sts and 15 1/2 rows = 4" [10 cm] in pat.
Pattern: 
Note: Wind small balls of the colors to be used, one for each area of color in the design. Start new colors at appropriate points. To change color, draw new color through last 2 loops of previous color as indicated.
With MC, ch 78.
1st row: (RS). 1 sc in 2nd ch from hook. *(Ch 1. Miss next ch. 1 sc in next ch) 4 times. Ch 1. Miss next ch.** 1 sc in next ch. With A, 1 sc in next ch. (Ch 1. Miss next ch. 1 sc in next ch) 4 times. Ch 1. Miss next ch. 1 sc in next ch. With MC, 1 sc in next ch.* Rep from * to * twice more, then from * to ** once. With MC, 1 sc in last sc. Ch 1. Turn.
2nd row: *With MC, 1 sc in next sc. (1 sc in next ch 1 sp. Ch 1. Miss next sc) 4 times. 1 sc in next ch 1 sp.** 1 sc in next sc. With A, 1 sc in next sc. (1 sc in next ch 1 sp. Ch 1. Miss next sc) 4 times. 1 sc in next ch 1 sp. 1 sc in next sc. Rep from * to * twice more, then from * to ** once. With MC, 1 sc in last sc. Ch 1. Turn.
3rd row: *With MC, 1 sc in next sc. (Ch 1. Miss next sc. 1 sc in next ch 1 sp) 4 times. Ch 1. Miss next sc.** 1 sc in next sc. With A, 1 sc in next sc. (Ch 1. Miss next sc. 1 sc in next ch 1 sp) 4 times. Ch 1. Miss next sc. 1 sc in next sc.* Rep from * to * twice more, then from * to ** once. With MC, 1 sc in last sc. Ch 1. Turn.
4th to 12th rows: Rep 2nd and 3rd rows 4 times more, then 2nd row once. Ch 1. Turn.
13th row: *With A, 1 sc in next sc. (Ch 1. Miss next sc. 1 sc in next ch 1 sp) 4 times. Ch 1. Miss next sc.** 1 sc in next sc. With MC, 1 sc in next sc. (Ch 1. Miss next sc. 1 sc in next ch 1 sp) 4 times. Ch 1. Miss next sc. 1 sc in next sc. Rep from * to * once more, then from * to ** once. With A, 1 sc in last sc. Ch 1. Turn.
14th row: *With A, 1 sc in next sc. (1 sc in next ch 1 sp. Ch 1. Miss next sc) 4 times. 1 sc in next ch 1 sp.** 1 sc in next sc. With MC, 1 sc in next sc. (1 sc in next ch 1 sp. Ch 1. Miss next sc) 4 times. 1 sc in next ch 1 sp. 1 sc in next sc. Rep from * to * once more, then from * to ** once. With A, 1 sc in last sc. Ch 1. Turn.
15th to 24th rows: Rep 13th and 14th rows 5 times more, ending with join MC, ch 1. Turn.
25th row: As 3rd row. Rows 2 to 25 form pat.
Cont in pat until work from beg measures approx 14 ins [35.5 cm] ending with a 12th row of pat omitting turning ch at end of last row. Fasten off.
With RS of work facing, join B with ss to lower right corner of Place Mat.
1st rnd: Work 1 sc in each sp along each side of Place Mat, working 3 sc in corners. Join with ss to first st.
Next rnd: Working from left to right, instead of from right to left as usual, work 1 sc in each sc around. Join with ss to first sc. Fasten off.

Beautiful Oven Mitts (crochet)

Crochet your own oven mitts to match the rest of your kitchen with this free pattern from Bernat Yarns.  These beautiful oven mitts are quick and easy to make and are also useful.

Size:

To fit average adult’s hand.
Materials:
 
  • Bernat Handicrafter Cotton Twists (340 g/12 oz) or yarn of your choice. 
    • 1 ball of #42116 (Country Twists).
  • Size 9 mm (U.S. M or 13) crochet hook or size needed to obtain gauge.
Gauge:
7 sc and 8 1/2 rows = 4" [10 cm] with 4 strands of yarn.
 
Pattern:Mitts (make 2):
With 4 strands tog, ch 18. Join with sl st to form a ring.
1st rnd: Ch 1. 1 sc in each ch around. Join with sl st to first sc. 18 sc.
2nd rnd: Ch 1. 1 sc in each sc around. Join with sl st to first sc.
Rep last rnd 6 times more.
Shape thumb gusset:
1st rnd: Ch 1. 1 sc in each of next 8 sc. (2 sc in next sc) twice. 1 sc in each of next 8 sc. Join with sl st to first sc.
2nd rnd: Ch 1. 1 sc in each of next 8 sc. 2 sc in next sc. 1 sc in each of next 2 sc. 2 sc in next sc. 1 sc in each of next 8 sc. Join with sl st to first sc.
3rd rnd: Ch 1. 1 sc in each of next 8 sc. 2 sc in next sc. 1 sc in each of next 4 sc. 2 sc in next sc. 1 sc in each of next 8 sc. Join with sl st to first sc.
4th rnd: Ch 1. 1 sc in each of next 8 sc. 2 sc in next sc. 1 sc in each of next 6 sc. 2 sc in next sc. 1 sc in each of next 8 sc. Join with sl st to first sc.
5th rnd: Ch 1. 1 sc in each of next 9 sc. (Place marker for thumb). Miss next 8 sc. 1 sc in each of next 9 sc. Join with sl st to first sc. 18 sc.
6th rnd: Ch 1. 1 sc in each sc around. Join with sl st to first sc.
Cont even until Mitt from beg measures 9" [23 cm].
Shape top:
1st rnd: Ch 1. Draw up a loop in each of first 2 sts. Yoh and draw through all 3 loops on hook – sc2tog made. 1 sc in each of next 5 sc. (Sc2tog over next 2 sc) twice. 1 sc in each of next 5 sc. Sc2tog over next 2 sc. Join with sl st to first sc. 14 sts.
2nd row: Ch 1. Sc2tog over first 2 sts. 1 sc in each of next 3 sc. (Sc2tog over next 2 sts) twice. 1 sc in each of next 3 sc. Sc2tog over next 2 sc. Join with sl st to first sc. 10 sts. Fasten off. Sew top seam.
Thumb:
With 4 strands tog, join yarn with sl st at marked sc for Thumb.
1st rnd: Ch 1. 1 sc in same sp as last sl st. 1 sc in each of next 7 sc. Join with sl st to first sc. 8 sc.
Rep last rnd 4 times more.
Next rnd: Ch 1. (Sc2tog) 4 times. 4 sts. Fasten off, leaving a long end. Thread end through darning needle and draw through rem sts. Fasten tightly.
Loop:
With 4 strands tog, ch 12. Fasten off leaving a long end. Sew loop to foundation ch as shown in picture.


Papercrafted Art Clock (home craft)

Impress everyone with this handmade paper crafted art clock that is easy and  inexpensive to make. Your friend will never believe you didn't buy this paper clock from a fancy department store and you'll love knowing that you have a homemade clock decoration for your shelf or nightstand.
Papercrafted Clock
Materials:
  • STYROFOAM Brand Foam:
    • Sheet, 12" x 12" x 1"
  • Art or scrapbook papers, assorted coordinating colors, several sheets
  • Battery-operated clock mechanism with extra long shank
  • Aluminum wire, 1/8" diameter
  • Silver jewelry findings: chain, 3" length; jump ring; 5 mm beads, four
  • Ruler
  • Paraffin or candle stub
  • Fine-line black permanent marker
  • Pencil, sharp
  • Serrated knife
  • Wire cutters
  • Straight pins, Extra-long
  • Scissors
  • Smooth needle nose pliers
  • Utility knife with sharp blade
  • Low-temperature glue gun and glue sticks
  • Paper appliqué glue
  • Tracing paper (Optional)
     
Download Pattern
Steps:
  1. Trace heart pattern outline onto foam sheet, omitting dashed line. Flip pattern over to complete heart. Wax serrated knife with candle stub or paraffin; cut out heart. Smooth rough edges with fingertips. Use pencil to poke hole through center of heart as shown for clock mechanism.
     
  2. Refer to photo/pattern to cover heart with various papers. Trace heart onto wrong side of desired paper for front (landscape scene used here, marked "a"); cut 1 1/4" wide strips to cover sides. Glue strips to heart sides, folding excess over foam edges. Glue front cover in place; let dry.
     
  3. Next, trace, cut, and glue three "b" areas (brown/blue print shown here) to heart. Note: Pattern markings are for first side of heart only, and are only suggested shapes.
     
  4. Trace, cut, and glue scalloped "c" area to bottom of heart. Cut several 1/2"-wide strips from same paper to glue around heart edges. Trace and cut out "d" pattern from rice paper or similar translucent material; glue to heart.
     
  5. Let heart dry flat, pinning papers to foam to secure until glue dries.
     
  6. Use pliers to bend two wire arms and one wire stand as shown. When heart is dry, use glue gun to glue arms to heart as shown. Glue small paper pieces over wire to conceal glue.
     
  7. Cut a 2" square from paper of choice. Fold two edges to meet at center, to measure 1" x 2". Wrap paper around top, straight edge of wire stand; glue paper ends together, allowing wire to pivot freely. Hold heart upright on work surface to ensure proper placement of stand. Glue paper ends only to back of clock, below hole for mechanism; let dry.
     
  8. Glue one end of chain directly to foam below top of stand. Add jump ring to free end of chain and join to stand, connecting it just above intersection of wire ends.
     
  9. Follow manufacturer's instructions to insert clock mechanism. Glue beads into foam surface to mark quarter-hour positions. Purchased clock face or numerals may also be used.

Mosaic Seashell wreath (summer craft)

Seashell crafts are becoming increasingly popular and make excellent bathroom decor or beautiful decorations for your beach home. The mosaic technique for this seashell wreath project sets it apart from many other sea shell wreath ideas.  Try something different!
Mosaic Seashell Wreath
Materials:
  • STYROFOAM™ Brand Foam:
    • Wreath, 12" x 2 1/4" x 2"
  • Light blue acrylic paint
  • Mosaic pieces (repurposed/broken china plates and ceramic tiles)
  • Pencil
  • Assorted seashells
  • Acrylic spackling
  • Wire hanger
  • Serrated knife
  • Paraffin or candle stub
  • Work gloves
  • Ruler
  • Disposable container
  • Rubber spatula
  • Flat paintbrush, medium
  • Container of water
  • Natural sea sponge
  • Clean, soft rag
  • Hammer
  • Tile knippers
  • Wire cutters
  • Six mosaic tile leaves
  • Old bath towel
  • Extra-long straight pins
  • Low temperature glue gun and glue sticks
Instructions:
  1. Wrap plates and tiles, one at a time, in old towel. Place towel on hard surface, like concrete sidewalk, and rap contents smartly with hammer. Do not hammer repeatedly or you risk disintegrating mosaic pieces. Check inside of towel periodically and remove pieces of desired size; wear work gloves at all times when handling broken items. Be sure to remove all shards from towel or discard towel entirely to prevent accidental cuts.
     
  2. Use glue gun to secure mosaic pieces, including leaves, to foam wreath in pleasing design. Use tile knippers to cut some pieces to size as needed. Fill in open spaces with shells or other interesting items. For large shells, use serrated knife to hollow out spaces in wreath so shells sit firmly, as in center opening. Refer to photograph as placement guide.
     
  3. Follow manufacturer's directions to mix spackling "grout" in disposable container until smooth and spreadable. Add a drop or two of acrylic paint to tint grout slightly.
     
  4. Apply grout to inner edges of wreath using spatula; be sure to push grout into spaces between mosaic pieces. Use flat paintbrush to spread grout around shells. Smooth grout as much as possible as you work. Let set a few minutes, then gently smooth using damp sponge. Rinse sponge often in fresh water. Use wet paintbrush to remove excess grout from shells and tight spaces.
     
  5. Use spatula to work grout into spaces between mosaic pieces on outside edges and front of wreath. Use damp sponge to wipe away excess grout and to smooth edges.
     
  6. Let grout set up slightly, then wipe face of mosaic pieces again with damp sponge. Let dry completely. Use clean, soft rag to polish mosaic pieces.
     
  7. Use wire cutters to cut 12" length from coat hanger. Fold wire in half and twist ends together, creating small loop at each end. Use pencil to poke two small holes in top center back of wreath and glue wire ends into holes. Dip straight pins in glue and insert into foam on angle through wire loops.
     

Starfish dishwash (crochet)


0This easy crochet pattern   mimics the phenomenal color changes in our friend the starfish, so you can keep a momento of the beach without getting sand between your toes.
 
Starfish Dishcloth

Materials:
  • Lily® Sugar‘n Cream® Stripes (2 oz / 56.7 g; 95 yds / 86 m)
  • 21010 (Natural Stripes) 1 ball
  • Size 5 mm (U.S. H or 8) crochet hook or size needed to obtain gauge.
  • 13 sc and 14 rows = 4" [10 cm] gauge
Instructions:
 
  1. Chain 2.  1st rnd: 5 sc in 2nd ch from hook. Join with sl st to fi rst sc.
     
  2. 2nd and 3rd rnds: Ch 1. 2 sc in each sc around. Join with sl st to fi rst sc. 20 sc at end of 3rd rnd.
     
  3. 4th rnd: Ch 1. 1 sc in each of next 2 sc. *Ch 9. Working in back loops only, 1 sc in 2nd ch from hook and each of the next 7 ch. Working in both loops, 1 sc in each of next 4 sc. Rep from * 4 times more; ending last rep with 1 sc in each of last 2 sc. Join with sl st to fi rst sc.
     
  4. 5th rnd: Ch 1. 1 sc in fi rst sc. *Miss next sc. Working in rem loops from previous rnd, 1 sc in each of next 7 sts. 3 sc in next st. Working in both loops, 2 sc in next sc. 1 sc in each of next 7 sc. Miss next sc. 1 sc in each of next 2 sc. Rep from * 4 times more, ending last rep with 1 sc in last sc. Join with sl st to fi rst sc.
     
  5. 6th rnd: Ch 2 (counts as hdc). *1 sc in each of next 8 sc. (1 sc. 1 hdc) in next sc. (1 hdc. 1 dc. 1 hdc) in next sc. (1 sc. 1 hdc) in next sc. 1 sc in each of next 8 sc.** Draw up a loop in each of next 2 sts. Yoh and draw through all loops on hook - sc2tog made. Rep from * 3 times more, then from * to ** once. Miss last sc. Join with sl st to top of beg ch 2.
     
  6. 7th rnd: Sl st in each of next 2 sc. Ch 1. 1 sc in each of next 9 sts. 2 sc in next hdc. *(1 sc. 1 hdc. 1 sc) in next dc. 2 sc in next hdc. 1 sc in each of next 9 sts. (Yoh and draw up a loop in next st. Yoh and draw through 2 loops on hook) 3 times. Yoh and draw through all loops on hook – dc3tog made. Rep from * 4 times more. Join with sl st to fi rst sc.
     
  7. 8th rnd: Sl st in next sc. Ch 1. *1 sc in each of next 10 sc. 2 sc in next sc. *(1 sc. 1 hdc. 1 sc) in next hdc. 2 sc in next sc. 1 sc in each of next 10 sc. Draw up a loop in each of next 3 sts. Yoh and draw through all loops on hook – sc3tog made. Rep from * 4 times more. Join with sl st to fi rst sc.
     
  8. 9th rnd: Sl st in next sc. Ch 1. *1 sc in each of next 11 sc. 2 sc in each of next 3 sc. 1 sc in each of next 11 sc. Sc3tog. Rep from * 4 times more. Join with sl st to fi rst sc.
     
  9. 10th rnd: Sl st in next sc. Ch 1. *1 sc in each of next 12 sc. 2 sc in each of next 3 sc. 1 sc in each of next 12 sc. Sc2tog. Rep from * 4 times more. Join with sl st to fi rst sc. Fasten off .
     

Tuesday, July 2, 2013

Firecracker Cake

Cake5
Firecracker Cake
Ingredients
  • White Cake Baking Mix
  • Red and Blue food coloring
  • White frosting of choice
  • Sprinkles
Instructions
  1. Heat oven to 325 degrees F. Generously grease the inside of a 12-cup fluted bundt cake pan.
  2. Make cake mix according to packaged directions. [b]Tip:[/b] [i]To cut down on fat, substitute the oil with applesauce.[/i]
  3. Pour 1 cup batter each into two separate bowls. Stir in desired amount of red food coloring in one bowl and blue food coloring in another. Mix well.
  4. Pour the red batter into the bottom of the pan and spread it out evenly with the back end of a spoon.
  5. Gently pour the white batter over the top of the red batter covering completely. If needed, use the back end of a clean spoon to spread out the batter.
  6. Carefully pour the blue batter over the center of the white batter. The blue batter does not need to completely cover the white batter. In fact, it looks best if you pour the blue in the center of the white and not have it spread out.
  7. Bake according to cake package directions or until a toothpick inserted in the center of the cake comes out clean.
  8. Remove from oven and allow to cool 5 mins in pan before inverting cake onto baking rack to cool completely.
  9. Meanwhile, evenly divide frosting into 3 separate microwavable bowls. Microwave one bowl of frosting on high for a few seconds until frosting is of a drizzling consistency. Stir in a few drops of blue food coloring until smooth. Using a spoon, drizzle frosting back and forth over cake creating a striped pattern. Repeat with second bowl using white frosting, and third bowl with red food coloring.
  10. Light sprinkle the sprinkles for garnishment.
  11. Let stand at room temperature until frosting is set. Transfer to a clean cake plate before serving.
To celebrate, let’s eat some cake. But this isn’t any ordinary cake. It’s a 4th of July Firecracker Cake! The perfect festive dessert to entertain a crowd on Independence day!
 
All you gotta do is use a pre-made white cake baking mix (or if you are a made-from-scratch-kind-of-gal, use a white cake recipe of your choice). Make the cake batter as usual, then separate one cup of batter into one bowl stirring in red food coloring until desired color is reached. Scoop another cup of batter into a separate bowl and stir in blue food coloring until desired color is reached.
Cake2
Next, we’re going to layer the batter. Start by pouring the red batter in the bottom of the bundt cake pan. Give the pan a little tap and shake to smooth out the batter. Then add the white batter making sure to entirely cover the red batter. And lastly, pour the blue food coloring over the white batter. The blue batter doesn’t need to cover the white batter. In fact, when your cake comes out, it looks better when you don’t.
Cake3
Bake according to your cake mix instructions. Look how beautiful the cake came out! A little puffier than I wanted, but it’s still moist and beautifully set.
Cake4
Lastly, divide your frosting up into three equal parts. You’ll want to “melt” your frosting in the microwave for a few seconds on high to make it of a drizzling consistency. Mix red food coloring in one bowl, blue in another, and with a spoon or fork, drizzle the frosting over the cake, zig-zagging back and forth as you go to form a striped pattern. Throw on a few sprinkles and you’ve got yourself a 4th of July Firecracker Cake! \
So cute. So fun. So festive.