Friday, June 28, 2013

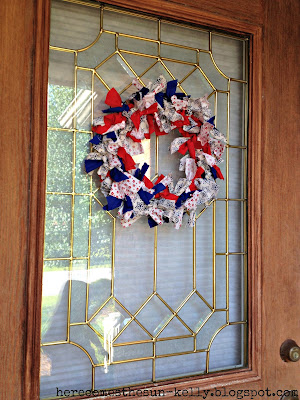
Patriotic Fabric Wreath (summer craft)

Patriotic Fabric Wreath   I found this on herecomesthesun-kelly.blogspot.com
Do you need a last minute July 4th decor idea?

This is super simple and pretty quick to make.  I made it in one night.


MATERIALS

Wreath form (I used a wire one from Michael's)
Fabric
Rotary cutter and board


DIRECTIONS

Cut strips of fabric 2 inches wide and approximately 16 inches long.  Cut LOTS and LOTS of strips.  You could use scissors but it is easier and quicker to do with a rotary cutter and board.

Double knot your fabric around the wreath form, one strip at a time.  Scrunch your fabric together until you fill the entire wreath.


Since it is not very heavy, I hung it on my front door with a 3M picture hanger.  


I hope everyone has a SAFE and HAPPY holiday!

Star Medallions (summer craft)

Wanna make some of these star medallions for your Fourth of July Party? They don't take long, and there's some time before Sunday.
Here's what you'll need and what you'll do...


What You'll NeedCotton fabric (not a heavy weight)
Spray starch
Iron
Ironing board
Pins
Sewing gauge
Sewing machine
Scissors
Fusible webbing
(or) Hot glue gun
Matching ribbon

Step 1 - Cut a length of fabric. The width of the fabric will be the diameter of the medallion, and the length should be about 1.6 times the width. So, as Martha Stewart's directions explain here, for a 15 1/2-inch medallion (width), cut about 25 inches of fabric (length).

Stripes can radiate from the center or circle out from the center, depending on the direction of your width. I did both.

If you have any extra material left at the end (as I did because my folds seems to get slightly bigger with each fold), just cut away at the extra.


Step 2 - Fold fabric in an accordion-style at 1 1/2-inch sections. I used a sewing gauge to mark 1 1/2 inch. Then, I pinned the first 1 1/2 inch fold down so it was easier to iron. After the fold, spray starch on the fold, and iron. Continue folding the length of fabric.

Your first and last folds should point in the same direction. Either both down or both up.


I noticed while I was ironing the medallions that this was "Fresh Lavender Scent." I love spray starch, but the lavender had me sneezing. Oops!


Step 3 - Fold the long rectangle in half, and pinch it together so you can see the center. Then stitch along the center of the rectangle to create the pivot.


Step 4 - With your sharp scissors (or rotary cutter if you have it), trim both ends of the folded rectangle. at a 45-degree angle, from the raw edge of the fabric. The easiest way to describe this: the raw edge should be in the scissors blade first.

I tried different angles for a different look, and it was a total failure. Do the 45-degree angle.


Step 5 - Here, I changed up Martha's directions a little bit. There are two ways you can do this. I'll explain both, and you can do whichever you think would be easiest for you.

Non-glue: Cut a piece of ribbon that will be used to hang the medallion, about six inches, and set it aside. Cut fusible webbing the length of half the full rectangle. I used two strips to cover the rectangle side to side.

Connect the sides of the medallion by fanning the fabric over and ironing the two ides together. (This is pretty difficult - not going to lie. It's hard to iron with the pleats.) Before you iron the tip, sandwich the piece of ribbon between the fusible webbing and the medallion.

Connect the other half of the medallion with the fusible webbing. Leave out the ribbon on this side.

Glue: (This is much easier!) Cut a piece of ribbon to use as a hanger, about six inches; longer if you want. Heat up your hot-glue gun. Apply hot glue on one side of the folded rectangle, then fold and firmly press the other half onto the hot glue. When you get to the top, glue in the ribbon. Repeat the gluing process for the other side of the folded rectangle.


Step 6: Then you're done! Now just hang your medallions. I used fish line to give the appearance that the medallions were floating.


And at night...


Seashell Wreath (summer craft)

Seashell Wreath
This seashell wreath was my "summertime" craft. 


This is not a difficult project at all, just a little time consuming.  Grab a wreath form, seashells, some ribbon and fire up your glue gun. 


Start by wrapping the wreath in ribbon.  I made a wire hanger to hang it. I didn't take a picture.   Don't scrimp...shells are even heavier than gumdrops!


Then glue, glue, glue, making sure to alternate the direction of the shells.


And there you go...a perfect wreath to celebrate summer!


Sunday, June 23, 2013

Dog Treat Jar (pet craft)

Give man's best friend his own Dog Treat Jar with enamel paint paw prints. These jars are cute and easy craft projects for dogs, and will surely bring a smile to your pet's face!

Glass Dog
 Treat Jar

Materials:
DecoArt Products Required
Americana Gloss Enamels
  • DAG67 - Black --- NEW!!
  • DAG164 - Light Buttermilk --- NEW!!
  • DAG265 - Tuscan Red --- NEW!!
Americana Brushes
  • DBR2004-B - Round 4
  • DBF3010-B - Shader 10
Supplies
  • Foam plate
  • 1/4" and 3/4" round foam pouncer brushes
  • Glass snack jar (We used a jar by Komodo Intl., item TP-7SL.)

Steps:

Preparation: Remove all stickers or labels from surfaces.
  1. Refer to photo for placement and use large pouncer dipped into Black to paint large paws on each flat side of jar.
  2. Use small pouncer and Black to stamp four small dots by each large one.
  3. With shader brush, paint Light Buttermilk lines for center of bones. Use small pouncer and Light Buttermilk to stamp two dots on each end to complete bone shapes.
  4. Use round brush and Tuscan Red to paint heart at center of bones and paw prints; let dry.

Kitty Treat Jar (pet craft)

Store those snacks for Tigger in his own treat jar made with painted kitty.
Painted Kitty Treat Jar

Materials:
DecoArt Products Required
Americana Gloss Enamels
  • DAG04 - Sand --- NEW!!
  • DAG31 - Baby Pink --- NEW!!
  • DAG67 - Black --- NEW!!
  • DAG163 - Honey Brown --- NEW!!
Americana Brushes
  • DBL1000-B - Liner 0
  • DBR2002-B - Round 2
Supplies
  • Foam plate
  • 1/2 and 1 1/4 in. round foam pouncer brushes
  • Glass canister: Anchor Hocking Item 85976
Steps:

Preparation: Remove all stickers or labels from surface before painting.
  1. Use 1 1/4" pouncer dipped in Honey Brown to make circle for cat head. Use round brush to make small triangles for ears on top of head. Let dry.
  2. Use 1/2" pouncer dipped in Sand to make small circle for cat's muzzle. Use round brush to paint stripes at upper sides of cat head. Let dry.
  3. Use liner brush and Baby Pink to paint inverted triangular nose and small triangles for inside ears; let dry.
  4. Use liner brush and Black to paint lines for whiskers and mouth; make small Black dots for eyes. Paint words "GOOD KITTY", using paw prints for letter O; let dry.

Beaded Dog Album (anytime craft)

Capture your cute pooch in beaded beauty. This is a fun album cover concept that works for any pet.
Beaded Dog Album Project
Materials:
  • 4” x 6” photo album with blank cover
  • Two 4” x 6” Treasure Tape sheets
  • Diamond Beadlets®
  • Miscellaneous buttons
  • Kreinik #12 Braid 021 Copper, 032 Pearl, 015 Chartreuse
  • Kreinik Japan #5 221J Burnished Gold
  • Shallow pan or tray
  • Photo of your dog or pet
  • Satin or organdy ribbon for edge
Steps:
  1. Lay one sheet of Treasure Tape on your album cover. Remove red liner to expose sticky part.
     
  2. Lay your pet photo centered on this tape. Cover with another piece of Treasure Tape, and remove its red liner to expose sticky area.
     
  3. Begin thread embellishment by writing in 021 Copper Braid. We wrote “My favorite things” but you can write your pet’s name, or any words. Then make other decorations, like the bone we made out of gold and pearl braids, or the cat shape out of pearl braid (with 015 chartreuse green eyes, and 221J burnished gold whiskers). Use our photo as a guide, or draw your own.
     
  4. Lay buttons along each side, pressing into the tape to secure.
     
  5. Lay satin or organdy ribbon along left side, as shown in photo.
     
  6. When embellishment is complete, lay your album in a shallow pan or tray and cover all remaining sticky areas with Diamond Beadlets. Swirl beadlets with your fingertips to make sure everything is fully covered.
     

"My Best Friend" Photo Frame (anytime craft)

Make this cute frame using FIMO soft oven-bake polymer clay and our new dog shape cutters to show off a photo of your favorite pet.
 
Dog Frame
 
Materials:
  • FIMO Soft Polymer Clay - 2 oz. package each of: Caramel, Sahara
  • 12 x 12 sheet of burlap fabric - natural
  • Small piece of burlap fabric - white
  • Dark brown embroidery thread
  • 12 x 12 Quilt batting
  • Purchased wooden frame

Tools:
  • AMACO Beveled Edge Cutters - Dog Set
  • AMACO Pasta machine or PolyRoller
  • AMACO Polymer Clay & Craft Oven
  • Small sheet of coarse sandpaper
  • Needle
  • White porcelain tile work surface
  • Rubber stamp - alphabet
  • Permanent black ink
  • Fabric glue
  • E6000 or similar glue
  • Tissue blade

Instructions:
  1. Condition both clays separately until they are at a workable consistency. Roll the clay through the pasta machine (or the PolyRoller) so you have a sheet approximately 1/8" thick. Using the clay shapes cut four footprints from the Caramel clay and cut the inserts for the footprints using the Sahara color clay. You will need four foot pad shapes and 16 toe pad shapes.
     
  2. Cut two dog house shapes one from each of the Sahara and Caramel clays. Cut three "bones", two from the Sahara clay and one from the Caramel clay. Use the "WOOF' stamp to press the word "WOOF" into the surface of the Sahara color dog house. Bake this shape by itself in the Polymer Clay & Craft oven according to clay manufacturers instructions. Allow to cool.


  3. Work a small amount of the Caramel color clay into the impressed WOOF in the dog house until the impression is backfilled with the clay.

     
  4. Using the dog house cutter, cut the roof from the still raw Caramel dog house. Place the Caramel color roof in place on the dog house and set aside for baking.


  5. Assemble the dog paws by placing the Caramel colored paws face up on the work surface. Place the foot and toe pads in position on the paws so they are layered on top of them. Use the sandpaper to lightly press a texture into the top of the pads.

     
  6. Using the sandpaper, texture the surface of the dog bones.

     
  7. Press rubber stamp letters to spell out "My Best Friend" followed by your dog's name on the bones, using dark brown or black ink on the stamps to ensure that the text can be easily read.

     
  8. If necessary, touch up with the sandpaper any places where you have pressed too hard and damaged the texture.

     
  9. Bake all shapes in the Polymer Clay & Craft Oven according to the clay manufacturer's instructions.

     
  10. Disassemble the frame and set the glass and backing aside. Trim the quilt batting to the shape of the frame, cutting it 1/4" smaller than the outside dimensions of the frame and cutting the hole " larger than the opening in the frame.
    If you place the batting over the frame you should be able to see the outside edge of the frame and the edge of the opening too.
     
  11. Cover the front face of the frame with fabric glue and adhere the quilt batting to the frame. Set aside to dry.

     
  12. Cut the burlap into four rectangles that you can piece together to cover the frame. Allow sufficient extra fabric to wrap around the edges of the frame and allow enough so the burlap edges will join easily. Cover the quilt batting with fabric glue and extend the fabric glue around the sides and across the back of the frame where the burlap will need to be glued. Adhere the burlap over the top of the quilt batting.

     
  13. You may find it easier to do this in sections working one section at a time and hold the burlap against the fabric glue until it is set - this should only take a minute or two. This way you can ensure the burlap is stretched and doesn't crease. Continue until the frame is covered.

     
  14. Cut two small squares of white burlap and one small square of natural burlap. Thread the needle with three strands of embroidery floss and stitch a rough square around the inside of the burlap squares. Fray the edges of the squares and then adhere the burlap squares to the frame using fabric glue.
     
  15. Finish by adhering the clay shapes to the frame using the finished project as a guide and using either E6000 or more fabric glue.
     
  16. Reassemble the frame - you can place the glass back into the frame or leave it out as desired. Trim a photo of your pet to the correct size for the frame, place the photo in position and replace the backing on the frame.

Beaded Curtain (home craft)

Materials Needed:   Beaded Curtain great for teens and tweens bedroom - Free project
Here are the yarns that were used in this project, but you can use any color you want!
Available yarn and colors may vary per store.
1 ball Lion Bouclé: Sorbet
1 ball Lion Bouclé: Sprinkles
1 ball Fun Fur: Turquoise
1 ball Fun Fur: Violet
1 ball Fun Fur: Hot Pink
Large-Eye Blunt Needles (Set of 6)
Assorted Beads
Tension Rod
INSTRUCTIONS
GAUGE: Gauge is not important in this project.

Step 1: You’ll need to take a measurement – just one! Decide where you’ll want your finished curtain to hang. If you’re hanging it in a doorway, measure the height (length) of the doorway. If you want the curtain to hang to the floor, measure from the top of the doorway all the way to the floor. If you’re going to put beads in your curtain, add a couple of extra inches for knots to hold the beads in place. Too long is okay - you can always shorten it if you need to.
Step 2: Figure out a pattern that you like. We alternated rows of Bouclé with Fun Fur, as follows:
Strand 1: Lion Bouclé, in “Sorbet"
Strand 2: Lion Fun Fur, in “Hot Pink"
Strand 3: Lion Bouclé, in “Sprinkles"
Strand 4: Lion Fun Fur, in “Turquoise"
Strand 5: Lion Bouclé, in “Sorbet"
Strand 6: Lion Fun Fur, in “Violet"
Strand 7: Lion Bouclé, in “Sprinkles"
Strand 8: Lion Fun Fur, in “Hot Pink"
Continue this pattern, alternating colors of Lion Bouclé with colors of Fun Fur, or make up a pattern that you like!

Step 3: Cut yarn the length of the doorway. Tie beads onto the strands in random places. When you finish a strand, tie it onto the tension rod. Keep repeating this until you have as many strands as you like going across the rod.

Step 4: Secure the tension rod in the chosen doorway.

That’s it! You’re done! Love the way it looks? Consider making beaded curtains for your windows, or one for a friend - they’re fun, fast, and fantastic!

* When selecting beads for your curtain, be sure that the hole in your beads is large enough for either a tapestry needle or a beading needle to pass through..

Cat Carrier (sewing craft)


Finished size: 14 5/8" x 13 3/4" Cat Carrier
Skill: 1 Time: 2 Cost: 3
You will need:•  1 1/3 yds. multicolor patch fabric*
•  3/4 yd. purple cat fabric*
•  Block fabrics*: 2 cat, 2 orange, 2 yellow
•  Cotton batting*
•  13 1/2" x 10 1/2" sheet plastic canvas (or other flexible plastic)
•  Variegated threads for quilting & top stitching*
•  Optional: Rotary cutter, mat
Embroidery needles, pencil, ruler, scissors, steam iron & board, straight pins, tape measure

•  Use 1/4" seam allowances unless otherwise indicated.
•  Sew pieces with right sides together
•  Press seams to one side after sewing each seam unless otherwise indicated.
STEP 1: Cut fabric. Cut 5 3/8" square blocks: 2 cats, 2 orange, and 2 yellow. From purple fabric, cut one 4 1/2" x 15 1/8" front strip, one 5 1/2" x 15 1/8" bottom strip, one 14 1/4" x 15 1/8" back piece, and two 5 1/2" x 7 1/2" ends. From multicolor fabric, cut the following pieces: one 15 1/8" x 33 1/2" lining, two 5 1/2" x 7 1/2" lining sides, and two 3 1/2" x 28 ½ straps. From plastic canvas, cut two 5" x 13 1/2" strips.
STEP 2: Sew outer layer. For front, sew two rows of three blocks with cat blocks in center and alternating arrangement of yellow and orange blocks (Figure 1). Join block units with one 4 1/2" x 15 1/8" purple strip (Figure 2). For bottom, sew 5 1/2" x 15 1/8" purple piece to bottom edge of block unit. For back, sew 14 1/4" x 15 1/8" purple piece to this piece (Figure 3).
Lay this unit right side down. Stack two plastic canvas strips and lay over carrier bottom (5" x 15 1/8" purple section). Whipstitch plastic canvas to bottom, stitching to seam allowances on each side.
Pin outer layer unit right side up on batting. Cut batting to same size. Quilt outer layer to batting with stipple quilting on the purple areas of the front and back (Figure 4). For sides, pin two purple 5 1/2" x 7 1/2" purple pieces on top of batting and cut out. Quilt together with stipple quilting.
STEP 3: Sew straps. Fold and press down a 1/4" hem on one long edge of each multicolor strap. Cut two pieces of batting 1" x 28 1/2". Center one batting strip on wrong side of one strap piece. Fold edge without hem over batting. Fold edge with hem on top of first fold, arranging batting so folded edge is next to edge of strap. Topstitch length of strap 1/8" from each side edge. Repeat for remaining strap.
STEP 4: Sew lining. Fold multicolor lining piece in half and pin to mark center lengthwise on each side. Mark center of 5 1/2" edge of a multicolor side piece and pin right sides together to side edge of lining, matching center marks. Repeat on opposite side (Figure 5). Sew bottom edges of side pieces to lining, stopping and starting 1/4" from edges. Clip seam allowance of lining only to points where seam begins and ends. Note: Be careful not to cut through stitching. Turn lining. Pin to side edge of side piece and stitch. Repeat for other side of side piece (Figure 6). Sew remaining side piece in same way. Press seams and leave wrong side out.
STEP 5: Assemble carrier. Sew quilted purple side pieces to carrier bottom in same way as Step 4. Pin and sew ends of one strap to front top edge of carrier, aligning raw edges with ends of straps 2" from side edges. Make sure strap does not get twisted (Figure 7). Repeat for remaining strap, sewing it to top back edge of carrier. Place carrier right side out inside lining. Align and pin all edges. Straps will be between carrier and lining. Stitch together, leaving a 6" opening along top edge for turning. Trim corners and clip where end pieces are sewn. Turn right side out and whipstitch opening closed. Top stitch across top edges of side end pieces 1/2" from edge.

Egg Cup Pincushion (sewing craft)

These are perfect for Easter, but fun anytime you want a little color in your surroundings. Use fabric scraps left over from a project to create several.
Egg Cup Pincushion
Materials:
  • Egg cup
  • Fabric scrap (approx. 5” square)
  • Polyfill
  • Needle Thread
  • Glue gun glue
Directions:
Eggcup Pincushion 1

1. Draw a 4” circle on the back of your fabric scrap. I used the bottom of a small dish to trace around. Cut out around the circle, approx. ¼” from your drawn line.
Eggcup Pincushion 2

2. Baste stitch around your drawn line, leaving long tails at the start and finish.
Eggcup Pincushion 3

3. Pull your long ends on one side (I pulled on the back side of the fabric) to gather into a pouch.
Eggcup Pincushion 4

4. Stuff the pouch with Polyfill, keeping thread pulled tight.
Eggcup Pincushion 5

5. Knot your threads, keeping the opening on the pouch as small as possible. Stuff with a little more Polyfill if you need to. The firmer you stuff it, the more rounded your cushion.
Eggcup Pincushion 6

6. With your needle and thread stitch the opening all the way closed. I worked from one side to the opposite for a few stitches, and then did the opposite direction a few times.
Eggcup Pincushion 7

You should now have a closed cushion as shown.
Eggcup Pincushion 8

7. Take a nice sized wad of Polyfill and roll it around in your hands to mat it together a little. Stuff inside your egg cup. You want it to fill the cup about ¾ of the way when compressed slightly.
Eggcup Pincushion 9

8. Run a line of hot glue around the top edge of your egg cup
Eggcup Pincushion 10

9. Press your stuffed cushion inside of the egg cup and hold for a few seconds, allowing for the glue to dry.
Eggcup Pincushion 11

That’s it! You’re done. You now have an egg cup pincushion. Now go make some more!
Group of Eggcup Pincushions


Spring Windsock (spring craft)


This is a fun project that can be created in a multitude of designs.

Parental supervision is recommended.


What you'll need:


  • White craft foam sheet
  • Green craft foam sheet
  • Craft foam sheets in multiple colors
  • 2 liter pop bottle
  • Clear plastic lanyard (Rexlace)
  • 4 pieces of Purple ribbon (1" wide x 18" long)
  • 4 pieces of Yellow ribbon (1" wide x 18" long)
  • Scissors
  • Pen
  • Hole Punch
  • Low temp hot glue gun or "the welder" glue
  • Fishing swivel hook

How to make it:


Note: You may need a friend to help you hold the craft foam in place while marking and punching holes in the bottle.

  1. Cut 2 liter bottle near the bottom where it begins to curve inward.
  2. Wash and dry 2 liter pop bottle.
  3. Hole punch down the short side of the craft foam, about 2" apart.
  4. Take a sheet of green craft foam and wrap around bottle, matching to cut end of bottle. (Note: Put punched edge on top)
  5. Mark holes with pen where holes are located.
  6. Remove from bottle and hole punch other short side that is marked.
  7. Cut a long string of Rexlace.
  8. Wrap green craft foam around bottle, matching hole punches.
  9. Tie a double knot in one end of the Rexlace.
  10. Thread the Rexlace starting at the bottom (near the neck of the bottle) through about 3 holes.
  11. Mark the remaining holes on to the bottle (under the craft foam).
  12. Remove the craft foam.
  13. Carefully using the scissors, punch holes where marked on the bottle.
  14. Slide craft foam back on to the bottle.
  15. Lace the Rexlace through the two layers of craft foam and the bottle. Double knot at the end. Cut off excess Rexlace.
  16. Cut out the fence out of white craft foam sheet. Glue on to the green sheet.
  17. Cut out bugs, flowers, and any shapes desired out of the different colors of craft foam.
  18. Glue the shapes together and then on to the windsock.
  19. Hole punch 8 holes, evenly spaced, around the bottom (neck end) of the windsock.
  20. Tie a knot on one end of a piece of ribbon. Thread the ribbon through the back of the windsock.
  21. Repeat for the rest of the ribbon, alternating colors around the windsock.
  22. Punch 4 holes in the top of the windsock. Note each pair of two should be across from each other.
  23. Cut 2 pieces of Rexlace about 2 feet long.
  24. Tie a double knot in one end of a piece of Rexlace. Thread the Rexlace from the inside to the outside.
  25. Then lace the Rexlace from the outside to the inside of the opposite hole. Tie in a double knot on the inside.
  26. Repeat for other piece of Rexlace in remaining two holes.
  27. Attach a swivel fishing hook to the loops.
  28. Hang and enjoy your windsock!

Cupcake Bath Bombs (personal craft)

Try not to eat these delicious-looking cupcakes, because they are made of soap! These cute cupcakes fizz when dropped in the bath. Make a whole batch for gift-giving occasions with this tutorial from Little Birdie Secrets.


Materials for bath bomb:
  • 2 c. baking soda
  • 1 c. citric acid (We found this in the bulk section at a local health food store)
  • 1 Tbsp. oil of your choice (We like almond oil, but grapeseed oil or even olive oil would work)
  • 5 drops fragrance/essential oil
  • 3-5 drops coloring (You can use food coloring, but it may fade quickly and even leave a ring around your bathtub. We used a special oil for bath products we found on Brambleberry.com.)
  • 1 tsp. Bentonite clay (optional--this just makes them harder; we found it here, too.)
  • 1 tsp. to 1 Tbsp. Sodium Lauryl Sulfate (optional--this makes your bombs lather up, and we also found it here.)
  • Witch hazel (poured into a spray bottle)
  • Paper cupcake liners
  • Silicone cupcake molds

Materials for icing:
  • 3 Tbsp. meringue powder (we like Wilton's) or powdered egg whites (you can use real egg whites or egg white substitute, but we didn't have very good luck with them)
  • 1 lb. (measured by weight) powdered sugar
  • 1/4 tsp. Cream of Tartar
  • 5-6 Tbsp. warm water
  • Few drops of color
  • Glass bowl
  • Hand mixer
  • Optional: Few drops of fragrance


Instructions:


  1. Prepare your molds by placing a cupcake liner inside the silicone cupcake mold. It won't fit perfectly--just shove it in.


  2. Place all the dry ingredients in a large bowl and gently mix. Be careful not to inhale it!


  3. Add fragrance to the dry mixture. Measure out the oil and place a few drops of color to it. Add it to the dry mixture. Gently mix.


  4. While kneading the mixture with one hand, begin spraying the mix with the witch hazel. (We did this as a team, but one person can do it alone.) Be careful not to get the mixture too wet--the moisture will activate the citric acid and your bath bomb will be ruined. Continue to slowly spritz the mixture with witch hazel and squish it in your hands until it has the consistency of crumbly pie dough.


  5. Quickly pack the mixture into your liners inside the silicone molds. You want it to be packed in tight. Allow the mixture to set in the silicone mold for at least 5-10 minutes before removing. Now let's add some frosting to these bad boys.

         
  6. Make your frosting- Mix meringue powder into warm water first in a GLASS bowl. Add cream of tartar and powdered sugar. Start beating on high. If your mixture feels like stiff cookie dough at this point, add another tablespoon of water. Beat for 7-9 minutes. Frosting is done when it forms stiff peaks and is thick and fluffy.

         
  7. Add color and fragrance and beat until well mixed (one minute or less).


        Note: If you decide to add baking soda (for fizziness) and sodium lauryl sulfate (for lather), you will want to increase your water to about 6-7 Tbsp. Add them with the color and fragrance.
     
  8. Spoon frosting into a disposable cake frosting bag with the cake decorating tip of your choice.

         
  9. Frost your cupcake bath bombs however you like. Allow bath bombs to sit overnight to harden before packaging. Be sure to let your children, husband, or dog know these are NOT EDIBLE!


  10. Package them in cellophane bags with pretty ribbons and tags for the perfect gift!